• Skip to primary navigation
  • Skip to main content
  • Skip to primary sidebar

Eat Something Delicious

  • About
    • FAQ
    • Ingredient Guide
    • Privacy Policy
    • Accessibility Statement
    • Contact Me
  • Recipes
    • All Recipes
    • Breakfast
    • Desserts & Treats
    • Drinks
    • Entrees
    • Family Favorites
    • I'm Only Human Recipes
    • Recipe Roundups
    • Sauces, Spices, & Extras
    • Seafood
    • Sides
    • Soups
  • Beyond Recipes
  • Contact Me
menu icon
go to homepage
  • Recipes
  • Extras
  • FAQ
  • Contact
    • Email
    • Instagram
    • Pinterest
  • search icon
    Homepage link
    • Recipes
    • Extras
    • FAQ
    • Contact
    • Email
    • Instagram
    • Pinterest
  • ×

    Make-Ahead Logging Truck Cake Decorations

    February 28, 2023 By Meagan Fikes Leave a Comment

    A cake decorated to look like a log with a decorative logging scene on top.
    A Lego minifigure holding a stick with a marshmallow over an unlit candle shaped like a 3.

    Some links on this site are affiliate links which means that if you make a purchase at one of these links, I may receive a small commission at no additional cost to you. Additionally, I am a participant in the Amazon Services LLC Associates Program, an affiliate advertising program designed to provide a means for sites to earn fees by linking to Amazon.com and affiliated sites. I only link to products and services I personally recommend and believe will benefit my readers. These links help to cover some of my blogging expenses. I appreciate your support!


    Skip to:

    In this post, you will find all the cake components that can be made or purchased ahead of time if you plan on making my logging truck cake. Of course, these decorations don't have to be limited to a logging truck cake. You can always pick and choose what decorations you want to make and apply them to a cake of your own. Use the menu above to jump straight to whatever you're interested in!

    Mushroom Cookies

    The mushroom cookies were a really fun touch and I think the bright red added some much needed color contrast to the overall cake. Most of mine turned out pretty sloppy and I actually smeared the red buttercream with my fingers a few times after the cookies were already placed on the cake! I did get better as I went though and if I were to make these again, I think they'd turn out much better.


    Cookies have a pretty long shelf life so I actually baked these several days ahead of the party. I adhered the stems and caps together the night before and did the frosting decoration on top the morning I made the cake. Next time, I would do the frosting the night before so that it could dry out better and be more resistant to smudging.

    I really don't know if it's ok to use straight white food coloring like paint but it worked in terms of appearance and I don't think the cookies had any strange taste. A whitened frosting could also work for the spots but I was taking some serious shortcuts in terms of time management!

    A cookie in the shape of a mushroom with a red cap and white spots in front of chocolate tree bark and green cake "moss".
    Print

    Recipe

    A cookie in the shape of a mushroom with a red cap and white spots in front of chocolate tree bark and green cake "moss".

    Mushroom Sugar Cookies

    ★ 5 Stars ☆ ★ 4 Stars ☆ ★ 3 Stars ☆ ★ 2 Stars ☆ ★ 1 Star ☆ No reviews
    • Author: Meagan Fikes
    • Prep Time: 40 mins
    • Cook Time: 6 mins
    • Total Time: 46 minutes
    • Category: Dessert
    • Method: baking
    • Diet: Gluten Free
    Print
    Pin

    Description

    Sugar cookies shaped like small mushrooms with buttercream frosting intended for decorating a logging truck scene cake.


    Ingredients

    • ⅓ batch unbaked gluten free sugar cookie dough from lila loa (swap the regular butter with dairy free)
    • 1-2 individual dairy free caramels, see notes
    • ¼ C plain dairy free buttercream (set aside from the batch made for the logging cake)
    • red gel food coloring, as needed
    • white gel food coloring, as needed

    Additional Materials:

    • cooling rack
    • food-safe paint brush

    Instructions

    1. Preheat oven to 375ºF.
    2. Roll the cookie dough into several small balls and place on a parchment-lined cookie sheet. The size will depend on how large you want your mushroom caps. You'll want to make more than you plan on putting on the cake to allow for errors (don't worry, the ugly ones taste just as good!)
    3. Shape more cookie dough into cylindrical, stem-like shapes. They should be appropriately sized for the mushroom caps. I experimented with a variety of thick/thin, long/short, straight/curved shapes until I found what I liked.
      Unbaked cookie dough in the shape of small balls and stems on parchment paper.
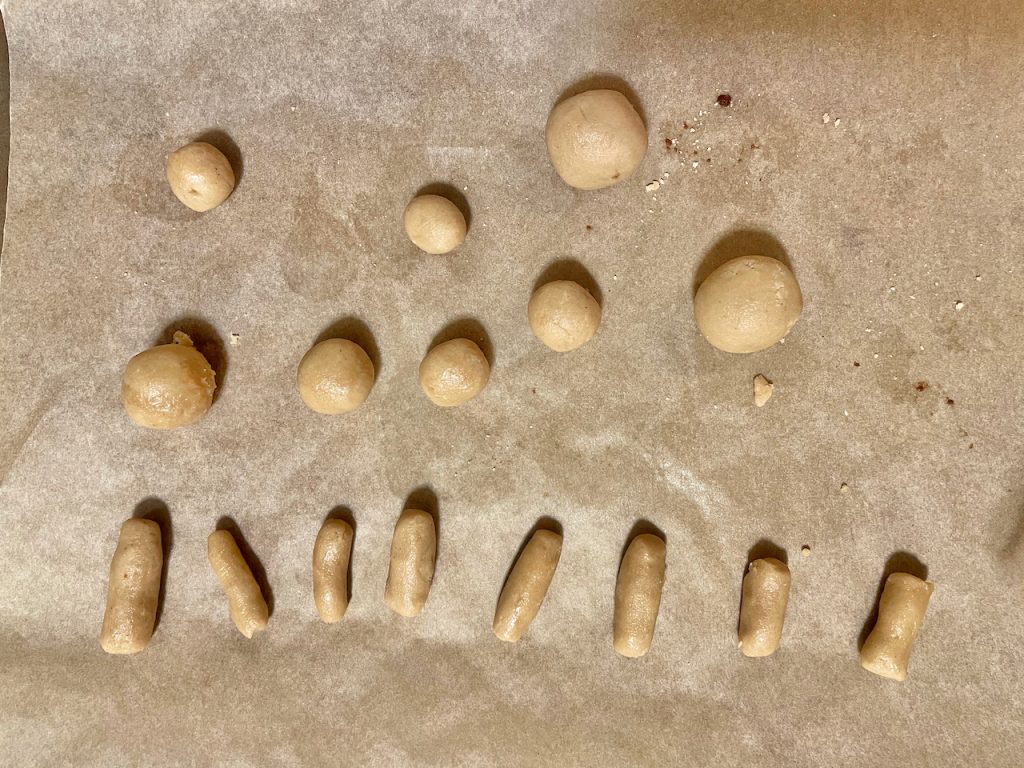
    4. Bake the shaped cookie dough for 5-6 minutes depending on the size you made. Then allow the cookies to fully cool on the cookie sheet.
    5. Once the cookies are cool, use a very sharp paring knife to gently cut away a small hole in the flat part of the cookie mushroom caps. It should be slightly larger than the "stem" you're using with that cap.
    6. Microwave the dairy free caramel for just 5 seconds or until it's soft enough to manipulate with your fingers. Remember if you microwave it too long it will be way too hot to touch. Break off a tiny piece of the caramel and stick it into the hole you cut. Immediately press a stem into the caramel to stick it in place. Set aside until the caramel cools.
      Plain, undecorated cookies in the shape of small mushrooms on a blue plate.
    7. Put the buttercream in a microwave safe bowl and again, being super gentle with the microwave times, heat for a few seconds. Start with 5 seconds and continue adding from there - you want the frosting to lose it's hold and be dip-able/ever so slightly runny but not so cooked that the oils split out.
    8. Stir in a drop of red food coloring at a time until you reach your desired tint.
    9. Get out your cooling rack. Dip each mushroom cap in the red frosting, using the stem to hold them, then place the stems through the holes of the cooling rack so the frosting can dry without smudging.Small cookies in the shape of mushrooms with red caps are set on a cooling rack.
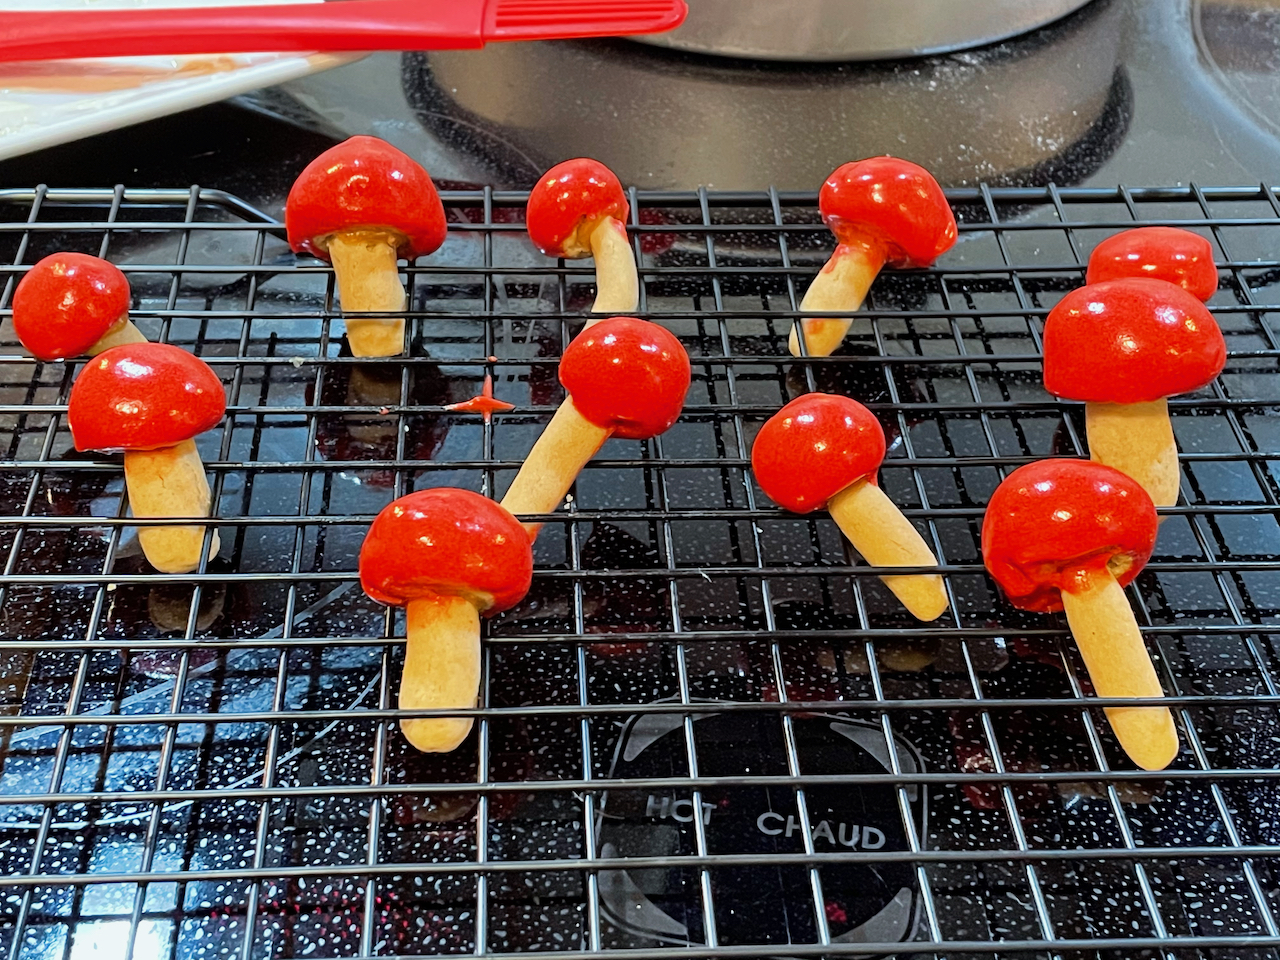
    10. Once the frosting is mostly dry, use a small food-safe paint brush dipped in white gel food coloring to paint on the white spots and allow to fully dry before using on a cake.A small cookie in the shape of a mushroom with a red cap and white spots has it's stem inserted into the hole of a cooling rack.

    Notes

    • Potential allergens contained in this recipe may vary due to brands of ingredients used, product reformulations, etc. Please verify that all your ingredients are safe for you to consume and always be mindful of allergen cross contact while cooking.
    • Cocomels were used to test this recipe which do not contain any dairy but they are made on shared equipment with other dairy products as well as peanut, tree nuts, and soy protein (according to their website, the equipment is "purged" before production). If you react to traces of dairy or these other allergens, you might try replacing the caramels with another sticky candy. I haven't tried it but a sticky dried fruit like mashed up raisins, apricots, or dates might hold too.

    Did you make this recipe?

    Tag @eatsomethingdelicious on Instagram and hashtag it #eatsomethingdelicious


    Chocolate Tree Bark

    The chocolate bark gets placed around the outside of the cake and is intended to look like tree bark. The food coloring is optional and the chocolate doesn't require tempering since the surface gets roughed up. For a fun added detail, I used a hot paring knife to carve Allen's initials (LAF) inside a heart, similar to a tree carving.

    Chocolate tree bark positioned on the side of a cake with the letters "LAF" within a heart carved into it. A red mushroom cookie, green cake "moss" and chocolate cake "dirt" are at the bottom of the cake.
    Print

    Recipe

    Chocolate tree bark positioned on the side of a cake with the letters "LAF" within a heart carved into it. A red mushroom cookie, green cake "moss" and chocolate cake "dirt" are at the bottom of the cake.

    Chocolate Tree Bark

    ★ 5 Stars ☆ ★ 4 Stars ☆ ★ 3 Stars ☆ ★ 2 Stars ☆ ★ 1 Star ☆ No reviews
    • Author: Meagan Fikes
    • Prep Time: 25 mins
    • Cook Time: 2 mins
    • Total Time: 27 minutes
    • Yield: 10 oz 1x
    • Category: Dessert
    • Method: microwave
    • Diet: Gluten Free
    Print
    Pin

    Description

    Roughed up chocolate shards intended to look like tree bark on a cake.


    Ingredients

    • 10 oz bag Enjoy Life semi-sweet chocolate chips
    • black gel food coloring, optional

    Additional materials:

    • parchment paper
    • rolling pin or similar object
    • paring knife
    • new toothbrush or stiff pastry brush

    Instructions

    1. Line a large cookie sheet with a piece of parchment paper.
    2. Pour chocolate chips into a microwave-safe bowl.
    3. Microwave 30 seconds and stir. Repeat until chocolate chips are melted down.
    4. Once the chocolate has melted, pour onto the parchment paper (use all the chocolate for thick bark or work in multiple batches for thinner bark).
    5. Add two or three drops of black gel food coloring (optional) and use a spatula to evenly spread out the chocolate. This will add small black streaks to the chocolate as the food coloring gets distributed.Melted chocolate with black food coloring streaks spread over a sheet of parchment paper.
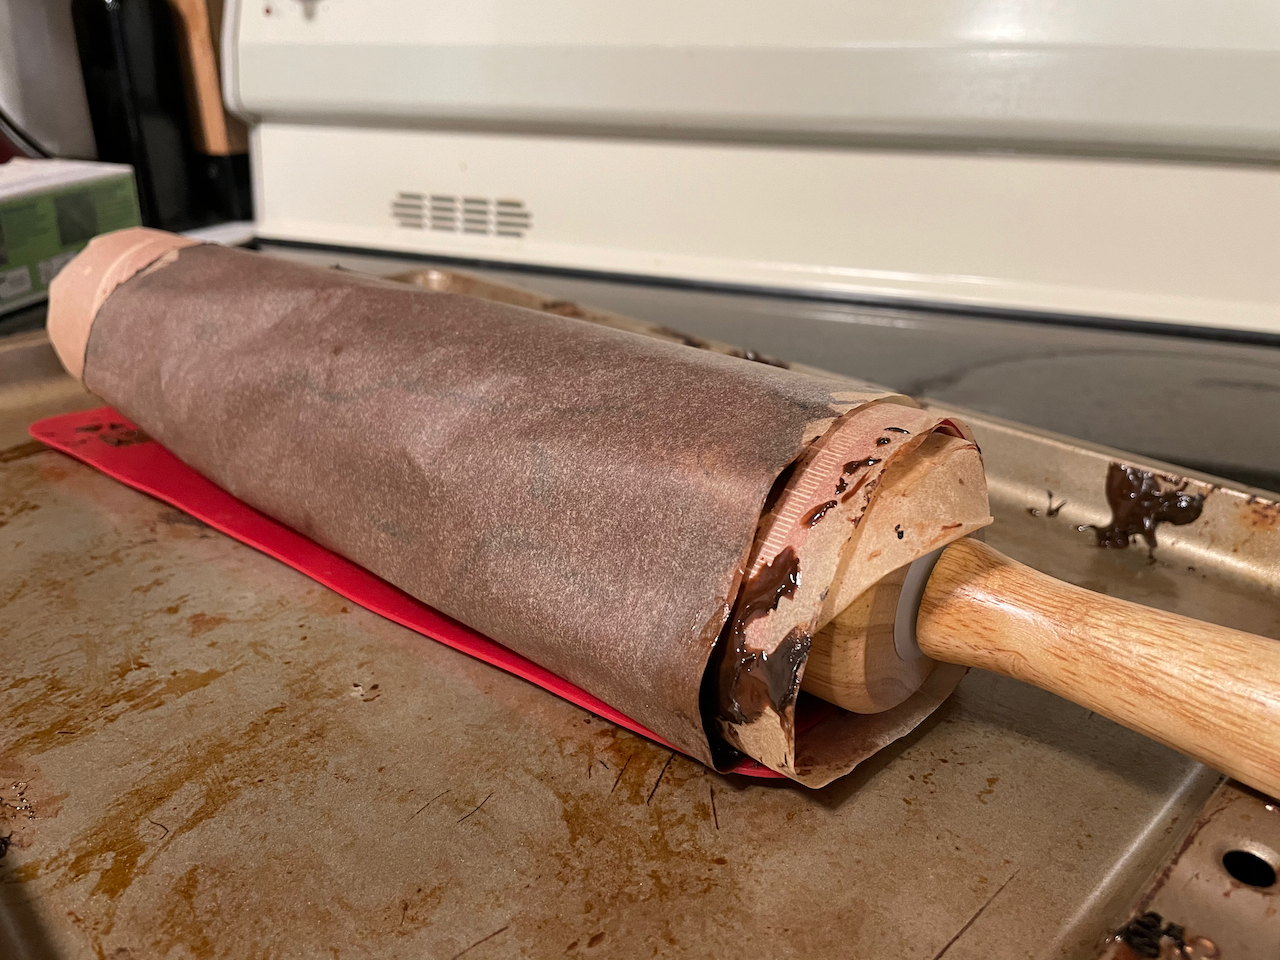
    6. Cover the chocolate with another sheet of parchment paper. Place a rolling pin on one end and gently wrap the chocolate filled parchment around it. Leave to harden overnight.Parchment paper with melted chocolate wrapped around a wooden rolling pin on top of a cookie sheet.
    7. Once the chocolate has hardened, slowly unroll the paper. The chocolate will break into shards but you can give it a little help if any pieces are too big. Hang onto the small pieces too because they can be used to fill in gaps on the outside of the cake later.Still smooth chocolate bark shards laying vertically atop a parchment lined baking sheet.
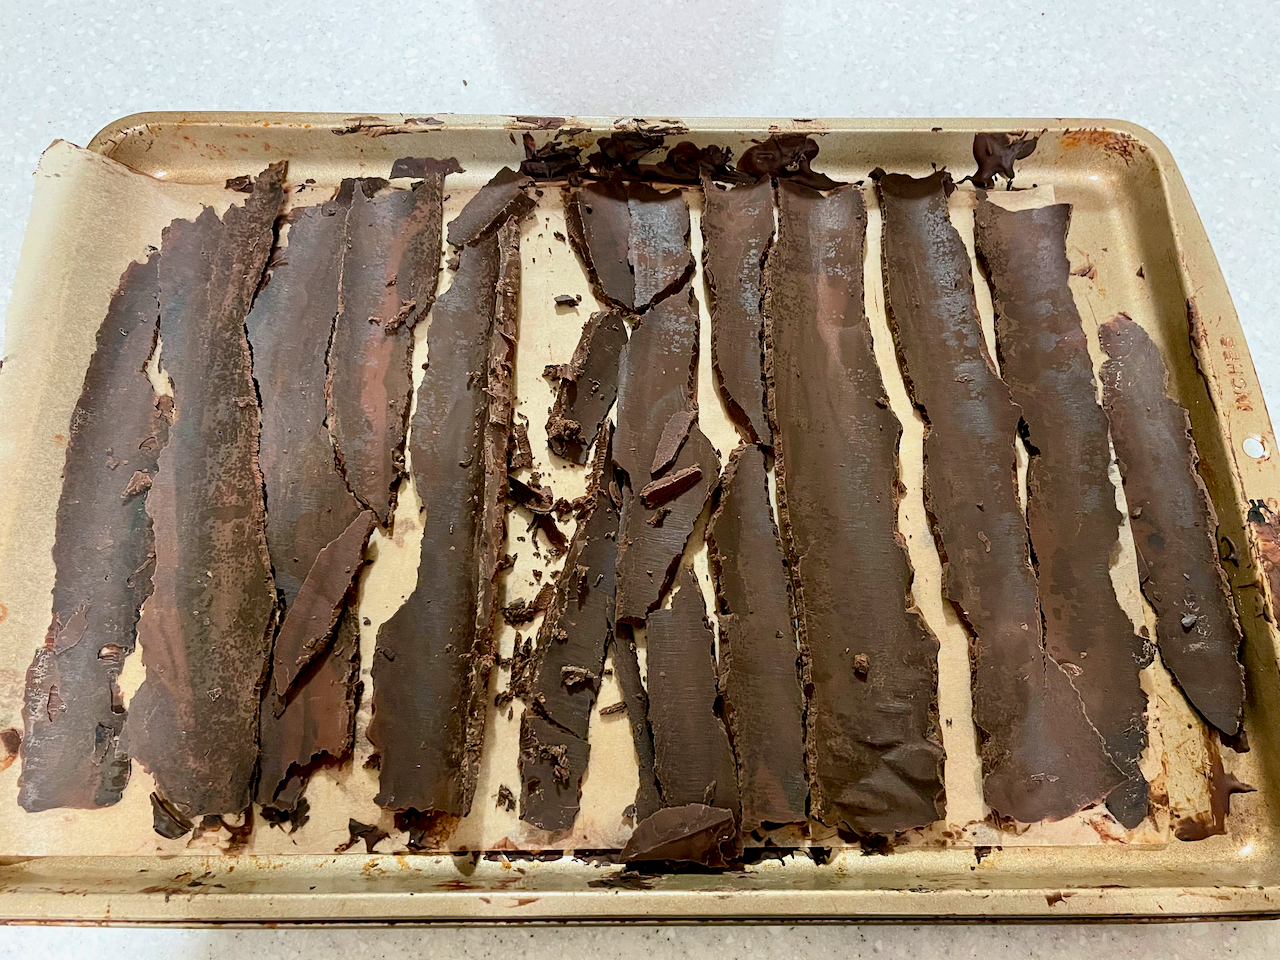
    8. To add texture to the bark, use the tip of a paring knife, the serrations on a steak knife, or in my case -  the plastic tool that removes remnants from a garlic press. Gently swipe the item lengthwise on each chocolate shard to make it resemble the texture of tree bark. Use a new toothbrush or stiff pastry brush to wipe off the chocolate shavings as soon as you're done with each piece. This ensures the shavings don't re-attach to the chocolate and make it look crumbly.
    9. As an added touch, you can add a "carving" to the bark. I did my son's initials in a heart but you could also do the person's age, a significant date, or whatever you want. Pick a piece of bark that you would like on the front of the cake (a wider piece is easier to work with). Dip the tip of a paring knife into hot water and wipe it dry. Use the hot knife to make you design, re-dipping it as the knife gets cool.
    10. Store chocolate bark in an airtight container until ready to use on your cake. You can stack multiple layers of it by separating each layer with parchment paper.

    Notes

    Potential allergens contained in this recipe may vary due to brands of ingredients used, product reformulations, etc. Please verify that all your ingredients are safe for you to consume and always be mindful of allergen cross contact while cooking.

    More than one batch may be needed to make it all the way around the cake plus provide room for slip-ups. Be generous with the amount you make - it can't be made last minutes since it takes so long to cool. I saved the leftovers and have been chopping them up to replace chocolate chips in my baking.

    Did you make this recipe?

    Tag @eatsomethingdelicious on Instagram and hashtag it #eatsomethingdelicious


    Mug Cake "Moss"

    I almost didn't make the moss but I like the extra detail and color it added. It barely took any time for me to make it and I already had all the ingredients I needed at home. I just looked online for a mug cake recipe and swapped the gluten and dairy ingredients 1:1 with ingredients I could eat.

    1. You'll need the mug cake ingredients found in Just So Tasty's Vanilla Mug Cake but replace the butter with dairy free "butter", milk with almond or carton coconut milk, and flour with Bob's Red Mill gluten free 1 to 1 flour. All the ingredient replacements use the same quantity. You will also omit the sprinkles.
    2. Follow Just So Tasty's recipe through step 3 to mix the ingredients into a batter.
    3. Use green and a touch of brown food colorings until the batter is a green moss color. (I used 2 drops McCormick green food coloring, 2-3 drops AmeriColor gel food coloring in Cork, and just a dipped toothpick's worth of Americolor gel food coloring in chocolate brown.
    4. Follow the cooking instructions on Just So Tasty and once cool, store in an airtight container until you're ready to decorate your cake.

    Cake Toppers

    A cake decorated to look like a tree stump with moss, dirt, and mushrooms around the outside and topped with a logging scene made using Lego people and toy trucks.
    A lego figurine with a chainsaw and a harness made from thread hanging from a tree.
    A green model logging truck on top of a cake that looks like a tree stump.

    I don't usually use inedible cake toppers (aside from the candles) but I thought the characters and scene really brought the cake to life and made it more enjoyable for Lenn Allen. Actually he threw a huge fit over that tiny marshmallow. It was all his tunnel vision could see on the cake and nobody understood what he was trying to tell us. We eventually figured it out and he got a pretty good sugar fix too.

    Trees

    For trees, we bought colored pencils made from tree cuttings and used some of them as guest favors too.

    Logging Truck with Log Piles

    I found the logging truck and little log piles on Wal-Mart's website. These are very small items and way too delicate for young kids but it fit perfectly on the cake and was so cute.

    Fork Lift

    We already owned the fork lift and I'm not sure where it came from. I was looking for an actual log loader but they're so hard to find and I only have so much money I can spend on a birthday cake anyways!

    LEGO Minifigure with Harness

    This guy was a little bit of work to get him to stay up in his "tree" but I thought it turned out really cute and was worth the extra effort.

    A lego person figurine with black string wrapped around him to resemble a harness.
    1. For the LEGO Minifigure, I found this lumberjack Minifigure. Mine looks slightly different than the one Amazon is showing but they are both cute.
    2. Start by tying one end of a string around the lumberjack's hips. Wrap the string in multiple layers from shoulder to between legs to other shoulder multiple times then begin wrapping it multiple times around the hips. Finish by securing a knot in the front but don't cut the length of string just yet.
    3. Figure out how far you want the Minifigure to hang down on the "tree" and tie the string around the top of the tree, leaving the correct length between the knot and the LEGO lumberjack. Cut off the excess string.
    4. Finally, add the chainsaw in the LEGO lumberjack's hand and use a little bit of hot glue to secure his feet to the tree so he stays still. I also added some hot glue between the chainsaw and tree to make him extra stable. After the party, I was able to easily peel the hot glue right off the plastic toy without any damage so it was still something my son could play with afterwards.
    A lego figurine with a chainsaw and a harness made from thread hanging from a tree.

    LEGO Minifigure Roasting a Marshmallow

    I thought he was so cute and it got even more fun once the candle was lit!

    A Lego minifigure holding a stick with a marshmallow over an unlit candle shaped like a 3.
    1. I purchased the LEGO Minifigure on Amazon.
    2. I kept the axe to place next to him on the cake and since he's clearly on his lunch break, I went into the backyard and found him a stick that would snap perfectly into his tiny hand so he could enjoy some s'mores.
    3. The mini marshmallows were actually too big so I cut one down to a smaller size and stuck it to the end of the stick.

    Profile image of Meagan cropped into a circle.

    About Meagan

    I started out with a passion for creating unique recipes and decorating cakes. In June of 2012, I discovered I was severely gluten intolerant then later learned of multiple food allergies. Fortunately, my love for trying new recipes, ingredients, and cooking methods made re-learning how to cook seem more like a fun challenge than an unfortunate circumstance. I'm so happy to say that my dietary restrictions haven't stopped me from doing what I love. I hope you enjoy these recipes as much as I do.

    Learn more about me →

    « Ground Beef Stroganoff
    Logging Truck Scene Birthday Cake »

    Reader Interactions

    Comments

    No Comments

    Leave a Reply Cancel reply

    Your email address will not be published. Required fields are marked *

    This site uses Akismet to reduce spam. Learn how your comment data is processed.

    Primary Sidebar

    About Meagan

    About Meagan

    I started out with a passion for creating unique recipes and decorating cakes. In June of 2012, I discovered I was not only severely gluten intolerant but also, many of the foods I was eating I simply couldn't include in my diet anymore. Fortunately, my love for trying new recipes, ingredients, and cooking methods made re-learning how to cook seem more like a fun challenge than an unfortunate circumstance. I'm so happy to say that my dietary restrictions haven't stopped me from doing what I love. I hope you enjoy these recipes as much as I do.

    Some links on this site are affiliate links which means that if you make a purchase at one of these links, I may receive a small commission at no additional cost to you. I only link to products and services I personally recommend and believe will benefit my readers. These links help to cover some of my blogging expenses. I appreciate your support!

    I'm a member of Food Blogger Pro. Learn how to start and grow your food blog.

    logo

    Food Advertisements by
    Affiliate link for 10 percent off your first order of Katz gluten free using the coupon code KATZ10. Click this image to purchase.
    Affiliate link for The Osso Good Co. bone broths. Image shows a sample selection of products in a pouch type packaging including beef, signature, or chicken bone broths as well as thai carrot, butternut squash, and tomato basil soups
    logo

    Food Advertisements by

    Footer

    ↑ back to top

    Eat Something Delicious logo

    Additional Content

    • Ingredient Guide
    • Gluten Intolerance & Celiac Disease
    • Recipe Index
    • FAQ

    Still Hungry?

    Join my newsletter to get email exclusive recipes, free downloads, and notifications of new blog posts - all by email.

    Sign Me Up!

    eatsomethingdelicious

    I was going to write some jokes about logging but I was going to write some jokes about logging but you wooden get them. Because they’re super dumb. Ok, I’ll share anyway.
.
How do lumberjacks find a missing exponent?
By using LOGarithms
.
What did the lumberjack wear to work on casual Friday?
His favorite Tree-shirt
.
When is the most stressful time of year for a tree?
Sept-timber
.
I told you they were bad, right? 😅 Cut me some slack, they were for a kids birthday party. Oh, and I have more…
.
Why did the logger get a gym membership?
He wanted to get lumber jacked 💪
.
Why couldn’t the tree answer the riddle?
He was stumped
.
What kind of beer do lumberjacks drink?
Loggers 🍻
.
Why did the logger have back pain?
He didn’t have enough lumber support
.
Embarrassingly enough, I have a bunch more but I’ll save them for a project in a later blog post. For now, I just have the cake.
.
This is a 2 part, absolutely massive blog post on making this logging scene cake from start to finish. The cake is chocolate and vanilla layers with cookies & cream filling. And as always, gluten free and dairy free.
.
The recipe is at the link in my profile
👉@eatsomethingdelicious
Thanks for chopping by 👋
.
.
.
.
.
#glutenfree #dairyfree #dessert #foodallergies #celiac #glutenintolerant #eatsomethingdelicious #cakedecorating #foodbloggerpro #cake
    Big news: I cleaned my house the other day 😅 Bu Big news: I cleaned my house the other day 😅 But seriously, it’s amazing how much having a clean space can help. My energy levels are completely uncalled for considering we’re well beyond a month of Erika barely sleeping at night and at least one family member dealing with a cold. I’m so tired of snot 😩 And being responsible for 3 peoples noses. We’re trying to graduate one nose to self-care but apparently the art of nose blowing takes a lot more boxes of tissues to master. We’ll get there.
.
Ok enough gross stuff. My finally clean again space has made me so much more focused and motivated to get things done. I’ve burned through most of my work to-do list and made it to the fun stuff that I don’t have to do but just want to. And since I was at that point, I decided to do something for myself by working on my blog. And I went a little overboard by working on 5 blog posts at once. I probably won’t get through them all but I have 3 ready so far.
.
This first post is a 30 minute ground beef stroganoff that I made almost 3 years ago. I didn’t do a great job writing down the recipe so I wasn’t able to post it until I figured out what I forgot to write down. Figured it out the other day and it was so good!
.
You can get the recipe at the link in my profile
👉@eatsomethingdelicious
.
.
.
.
.
#glutenfree #dairyfree #celiac #eatsomethingdelicious #30minutemeals #foodallergies #foodbloggerpro #glutenintolerant
    She’s finally here 🥰 Erika Claire Fikes was b She’s finally here 🥰
Erika Claire Fikes was born January 24th, 2022 at 1:35pm. 7lb 9 oz, 19 inches.
    Not really a new recipe but I shared my sons 4th b Not really a new recipe but I shared my sons 4th birthday cake on the blog today. Also wrote a recap on everything that’s been going on for the past year since I would normally write about it in my blog posts but haven’t written anything! I don’t know when I’ll be back on there. I’ve only had time for site maintenance and I really miss blogging but I’ll be back on once things slow down. The link to the new post is in my profile!
.
.
.
.
.
.
.
#glutenfree #dairyfree #cakedecorating #foodallergies #celiacdisease
    I almost didn’t make this into a casserole becau I almost didn’t make this into a casserole because the sauce and pasta combined made a delicious side dish on their own! @beldolcefood #sponsored my most recent blog post and provided me with their new gluten free fusilli and penne to try out. I used the fusilli in this recipe and the sauce is a creamy, cheesy enchilada sauce made from just 3 ingredients.
.
I ended up adding taco meat, fire roasted tomatoes, corn, black beans, and dairy free cheese to make a taco noodle casserole. Then we ate it all and I made it again! This is one of those recipes that will be going in our regular meal rotation.
.
This is a pretty versatile recipe. It can be made vegan just by leaving out the meat and it’s just as good. And as I said earlier, the pasta with just the sauce makes a really good side dish. You can also top it with whatever you like such as cilantro, jalapeños, sour cream, scallions, or salsa.
.
The recipe and details on @beldolcefood new gluten free pasta is linked in my profile:
@eatsomethingdelicious
Let me know if you try it!
.
.
.
.
.
.
.
.
.
#glutenfree #dairyfree #glutenfreefacility #pasta #casserole #beldolce #foodallergies #f52grams #foodbloggerpro #celiac #glutenintolerant #eatsomethingdelicious
    I’ll just say it - I’m one of those bloggers t I’ll just say it - I’m one of those bloggers that makes cakes for their blogs “birthdays”. Or uses the blog birthdays as an excuse to make yet another cake recipe....yeah, that’s probably more accurate.
.
Definitely felt like I needed a good excuse for this one because it’s my fifth variation of gooey butter cake! However, my site is seven years old so maybe I should have had seven gooey butter cakes ready to go? Guess I’d better get caught up before year eight 😉
.
Anyways, I really enjoyed this carrot cake variation of gooey butter cake. The cake layer/crust swaps out the yellow cake mix with spice cake mix and I added in some shredded carrots and raisins. I kept the “gooey” top layer the same except that I topped it with a sprinkle of cinnamon and additional raisins before baking.
.
If you want to try the recipe, the link is in my profile: @eatsomethingdelicious
.
.
.

.
.
.
.
.
.
.
.
#gooeybuttercake #foodallergies #glutenfree #dairyfree #foodbloggerpro #baking #celiac #f52grams #f52sweets #glutenintolerant #carrotcake
#glutenfreelife #eatsomethingdelicious
    Load More... Follow on Instagram

    Privacy Policy • Privacy Settings • Cookie Policy • Terms of Service • Accessibility Policy • Disclaimer

    COPYRIGHT © 2014-2023 EAT SOMETHING DELICIOUS • ALL RIGHTS RESERVED