• Skip to primary navigation
  • Skip to main content
  • Skip to primary sidebar

Eat Something Delicious

  • About
    • FAQ
    • Ingredient Guide
    • Terms and Conditions
    • Privacy Policy
    • Accessibility Statement
    • Contact Me
  • Recipes
    • All Recipes
    • Breakfast
    • Desserts & Treats
    • Drinks
    • Entrees
    • Family Favorites
    • I'm Only Human Recipes
    • Recipe Roundups
    • Sauces, Spices, & Extras
    • Seafood
    • Sides
    • Soups
  • Beyond Recipes
  • Contact Me
menu icon
go to homepage
  • Recipes
  • Extras
  • FAQ
  • Contact
    • Email
    • Instagram
    • Pinterest
  • search icon
    Homepage link
    • Recipes
    • Extras
    • FAQ
    • Contact
    • Email
    • Instagram
    • Pinterest
  • ×

    Allen's Tire Birthday Cake

    January 31, 2019 By Meagan Fikes Leave a Comment

    Allen's Tire Birthday Cake | Learn how to decorate a cake using only gluten free ingredients. I made this vanilla cake decorated in a tire tread pattern for my son's first birthday. | eatsomethingdelicious.com

    Allen's Tire Birthday Cake | Learn how to decorate a cake using only gluten free ingredients. I made this vanilla cake decorated in a tire tread pattern for my son's first birthday. | eatsomethingdelicious.com


    Some links on this site are affiliate links which means that if you make a purchase at one of these links, I may receive a small commission at no additional cost to you. Additionally, I am a participant in the Amazon Services LLC Associates Program, an affiliate advertising program designed to provide a means for sites to earn fees by linking to Amazon.com and affiliated sites. I only link to products and services I personally recommend and believe will benefit my readers. These links help to cover some of my blogging expenses. I appreciate your support!


    To skip straight to the recipe, click here.


    I've missed decorating cakes so much! You may have seen me mention or read in my bio that my passion for cooking began with cake decorating. After being diagnosed with gluten intolerance, I gave up cake decorating for a while because 1) I had to start cooking all my own meals so there was no extra time to make cakes, 2) I was unsure if certain decorating ingredients were safe for me, 3) I had my doubts that a cake without gluten would be sturdy enough to hold multiple layers and heavy decorations, and 4) I had to replace all my decorating equipment that had touched gluten which is so expensive! The idea of picking it up again was overwhelming.

    Allen's Tire Birthday Cake | Learn how to decorate a cake using only gluten free ingredients. I made this vanilla cake decorated in a tire tread pattern for my son's first birthday. | eatsomethingdelicious.com

    I took care of my urge to bake by re-learning how to bake, this time using unfamiliar gluten free flours and other ingredients. I stopped sharing large cakes with people and started a blog to share my own original recipes. I also switched my creative outlet from cake decorating to food styling and food photography for the blog. All of this kept me happy but I still had the itch to make more cakes.

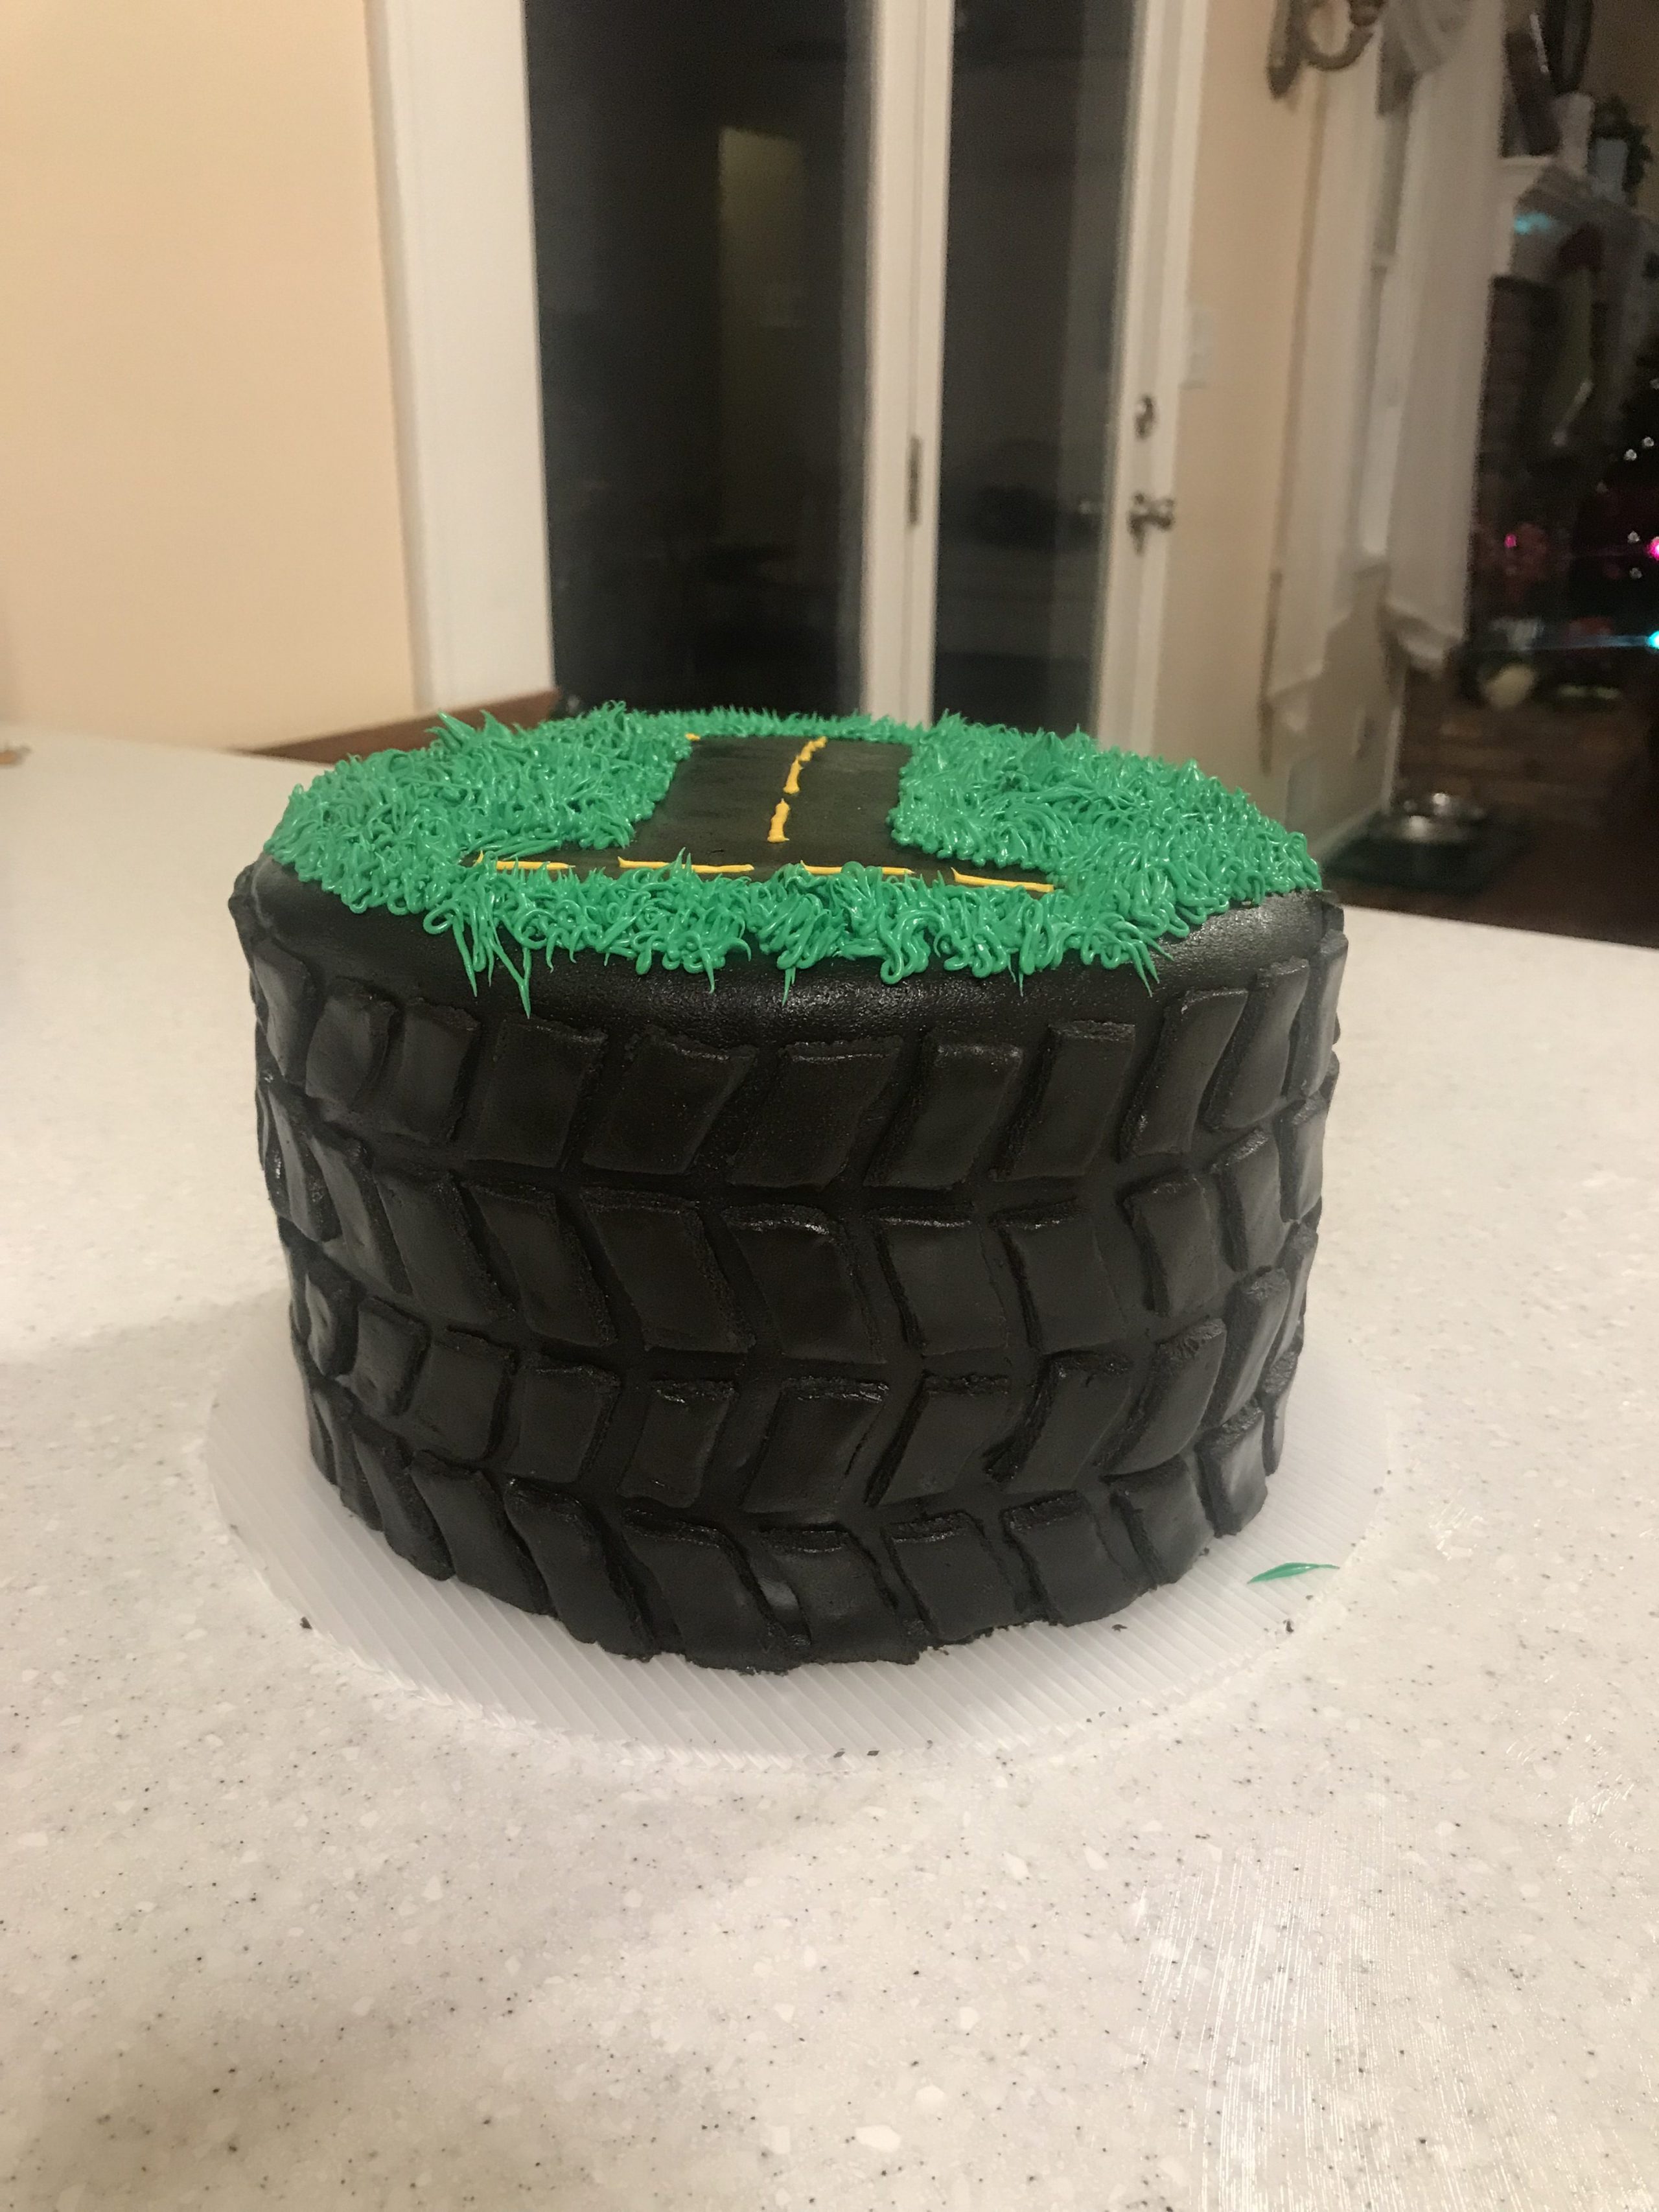
    My son's first birthday was in December and I decided to just go for it! He's obsessed with cars and wheels (and anything that kind of looks like it might be a wheel) so I started thinking of how I could make a cake look like a car or the simpler shape - a tire.

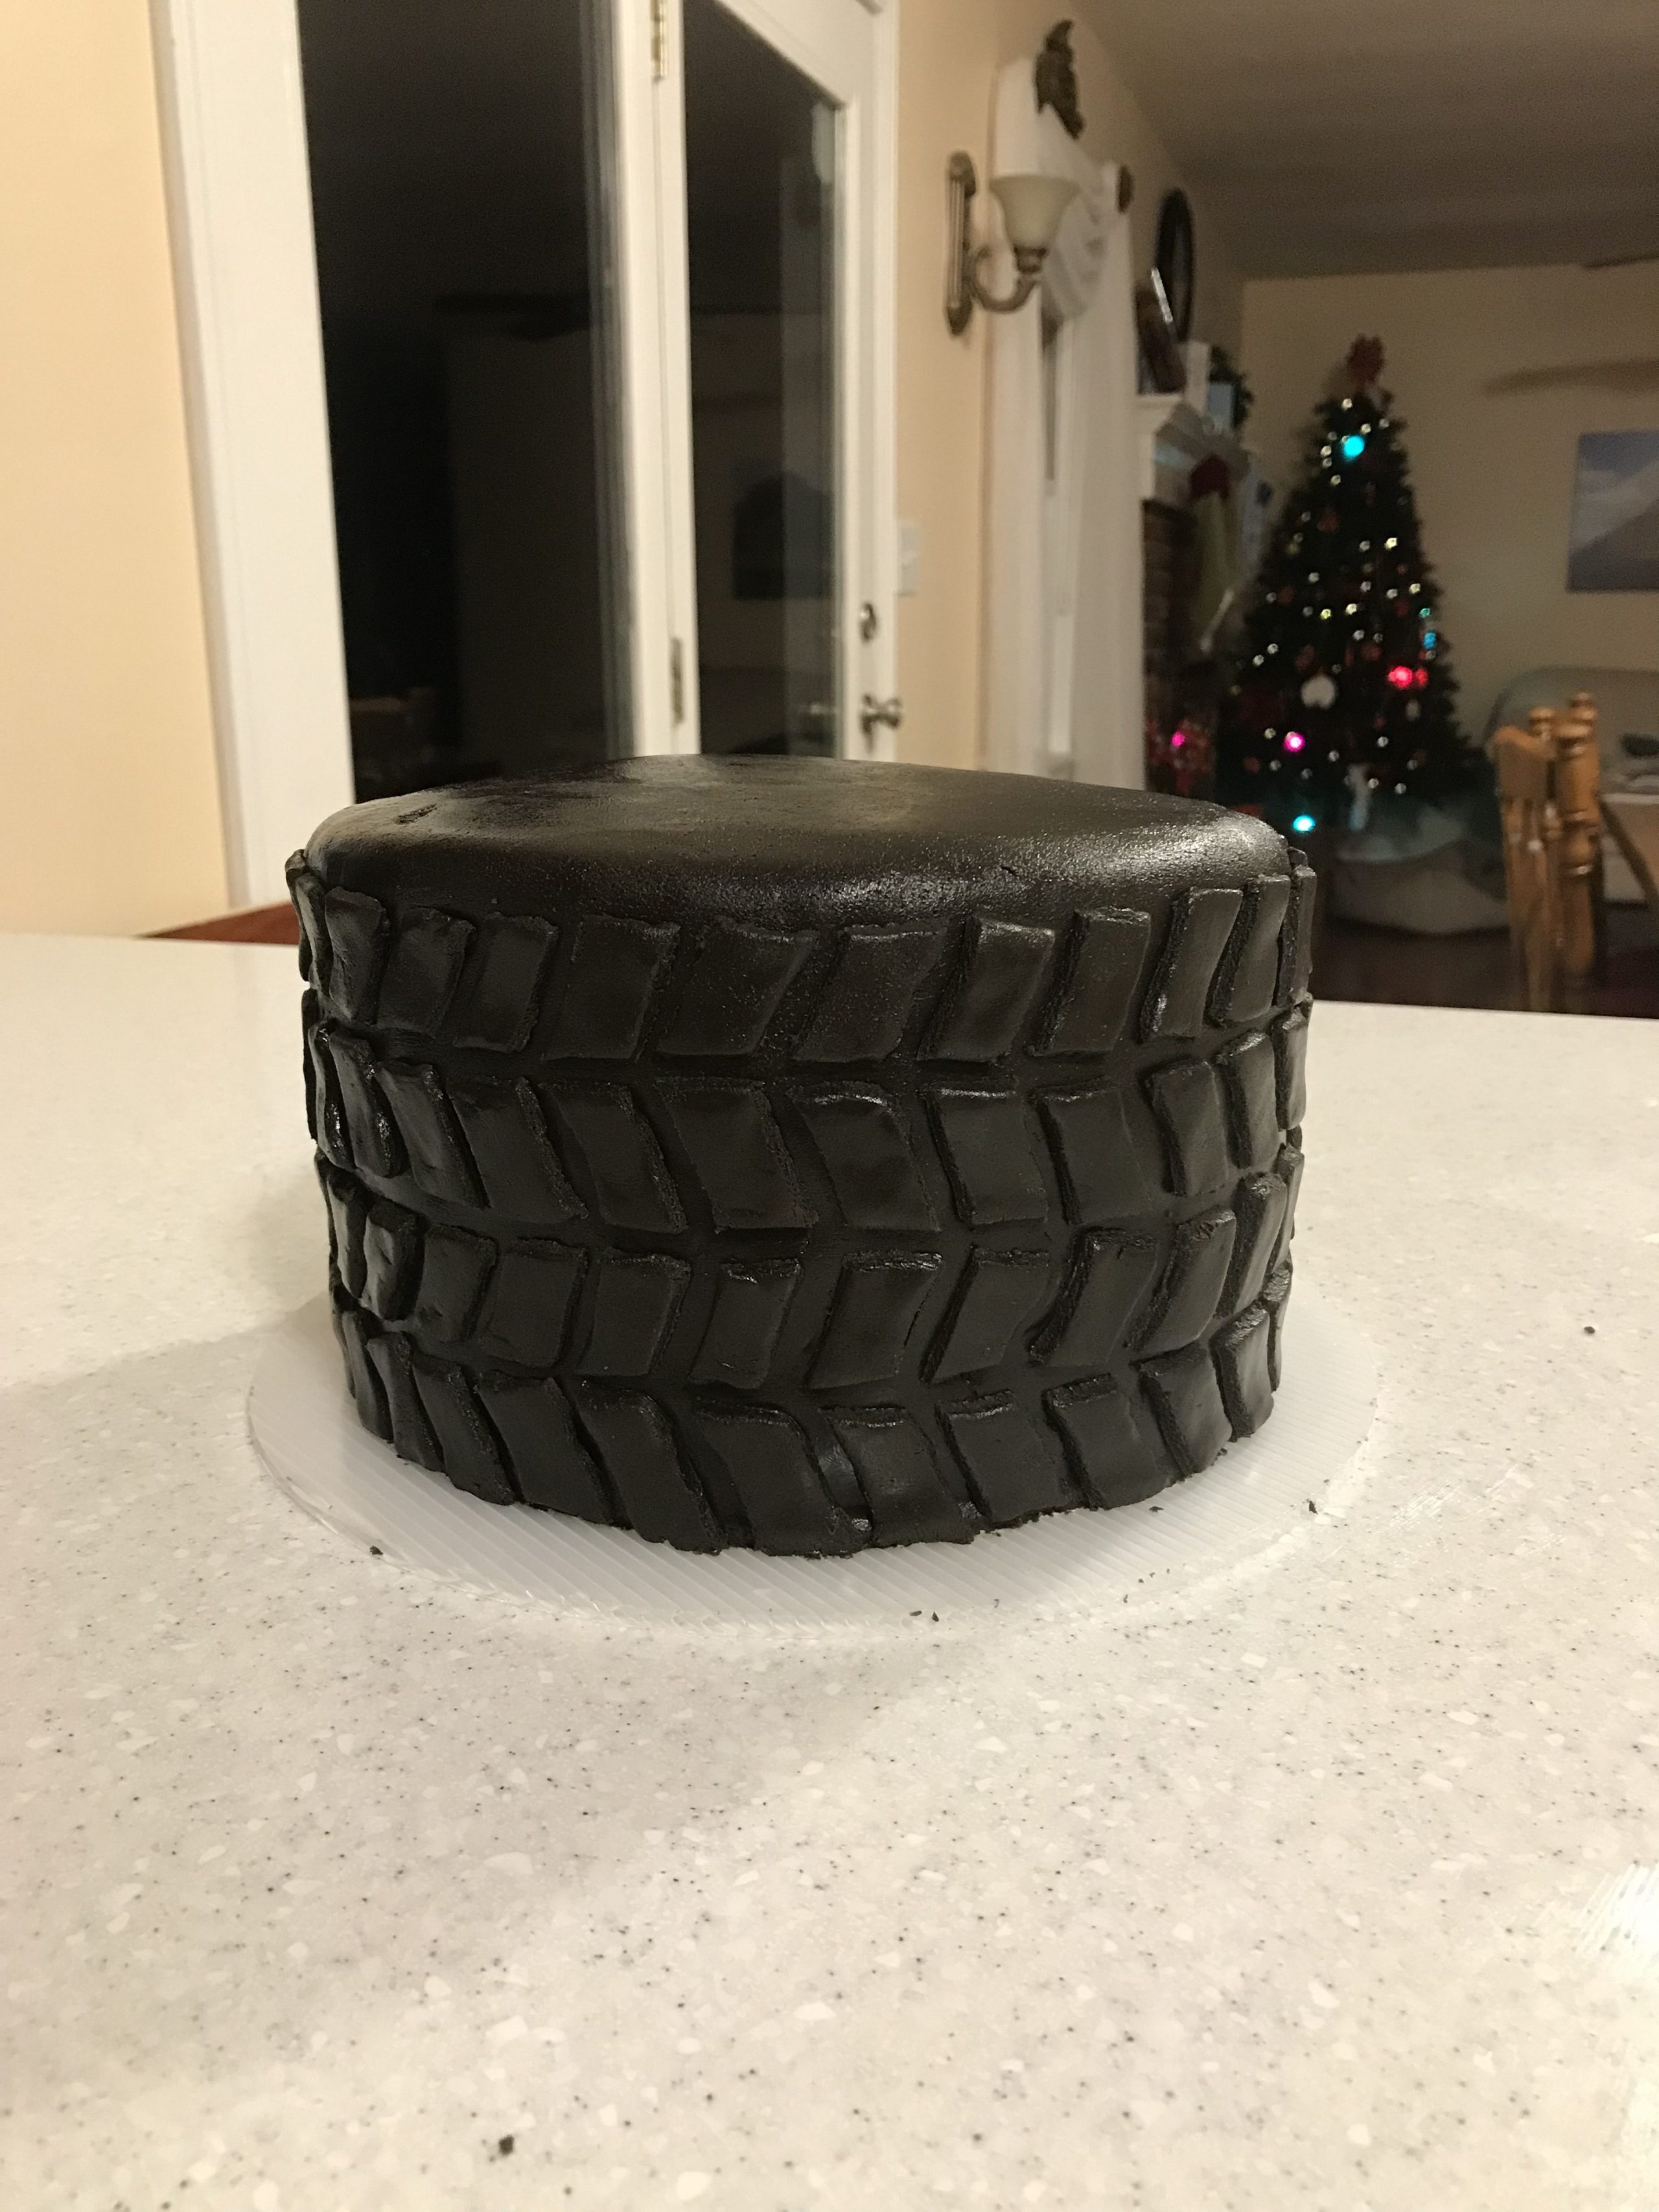
    I was at a loss on how to make the tread so I started searching Pinterest and yes, this had been done many, many times before. I really liked the tread pattern used on the website "Yes It's Cake" so I tried to imitate that pattern.

    Allen's Tire Birthday Cake | Learn how to decorate a cake using only gluten free ingredients. I made this vanilla cake decorated in a tire tread pattern for my son's first birthday. | eatsomethingdelicious.com

    Now, keep in mind, I wasn't great at cake decorating before this and it's been about seven years since I last tried! I took a few shortcuts that I knew better than to take and unfortunately, it shows. And those "shortcuts" really only saved a few minutes over the span of a nine hour project so it wasn't worth it. I'll tell you where I cut corners and what I would do different next time.

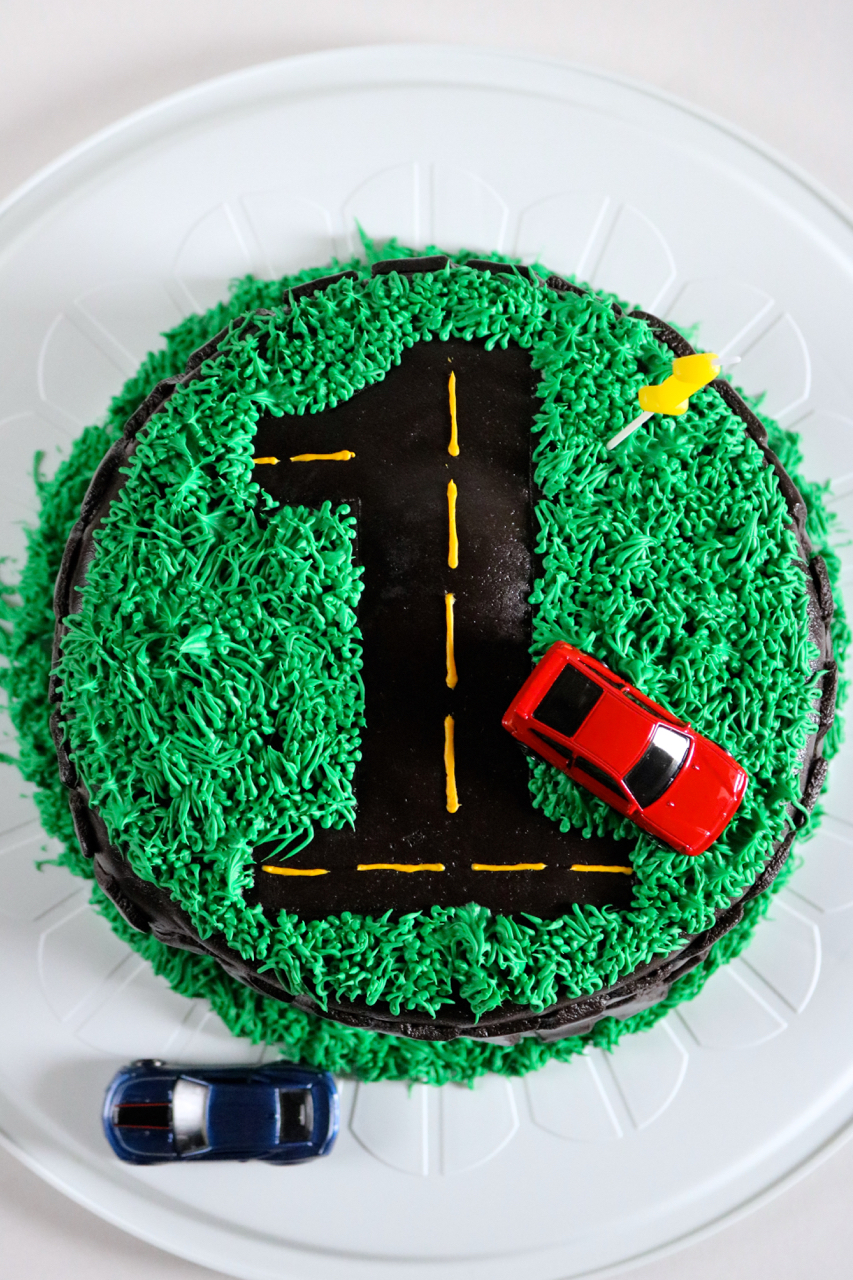
    I think the most obvious mistake was the piping icing. I couldn't find my recipe for the icing I usually make (which wouldn't have even taken 10 minutes) so I just used the store bought stuff and figured I'd add powdered sugar to stiffen it. Except I lost my patience and didn't add the powdered sugar. Since the icing was too runny, the grass didn't hold a nice shape and many strands were too long. Thankfully, I found my icing recipe so I could at least include it in this post.

    Allen's Tire Birthday Cake | Learn how to decorate a cake using only gluten free ingredients. I made this vanilla cake decorated in a tire tread pattern for my son's first birthday. | eatsomethingdelicious.com

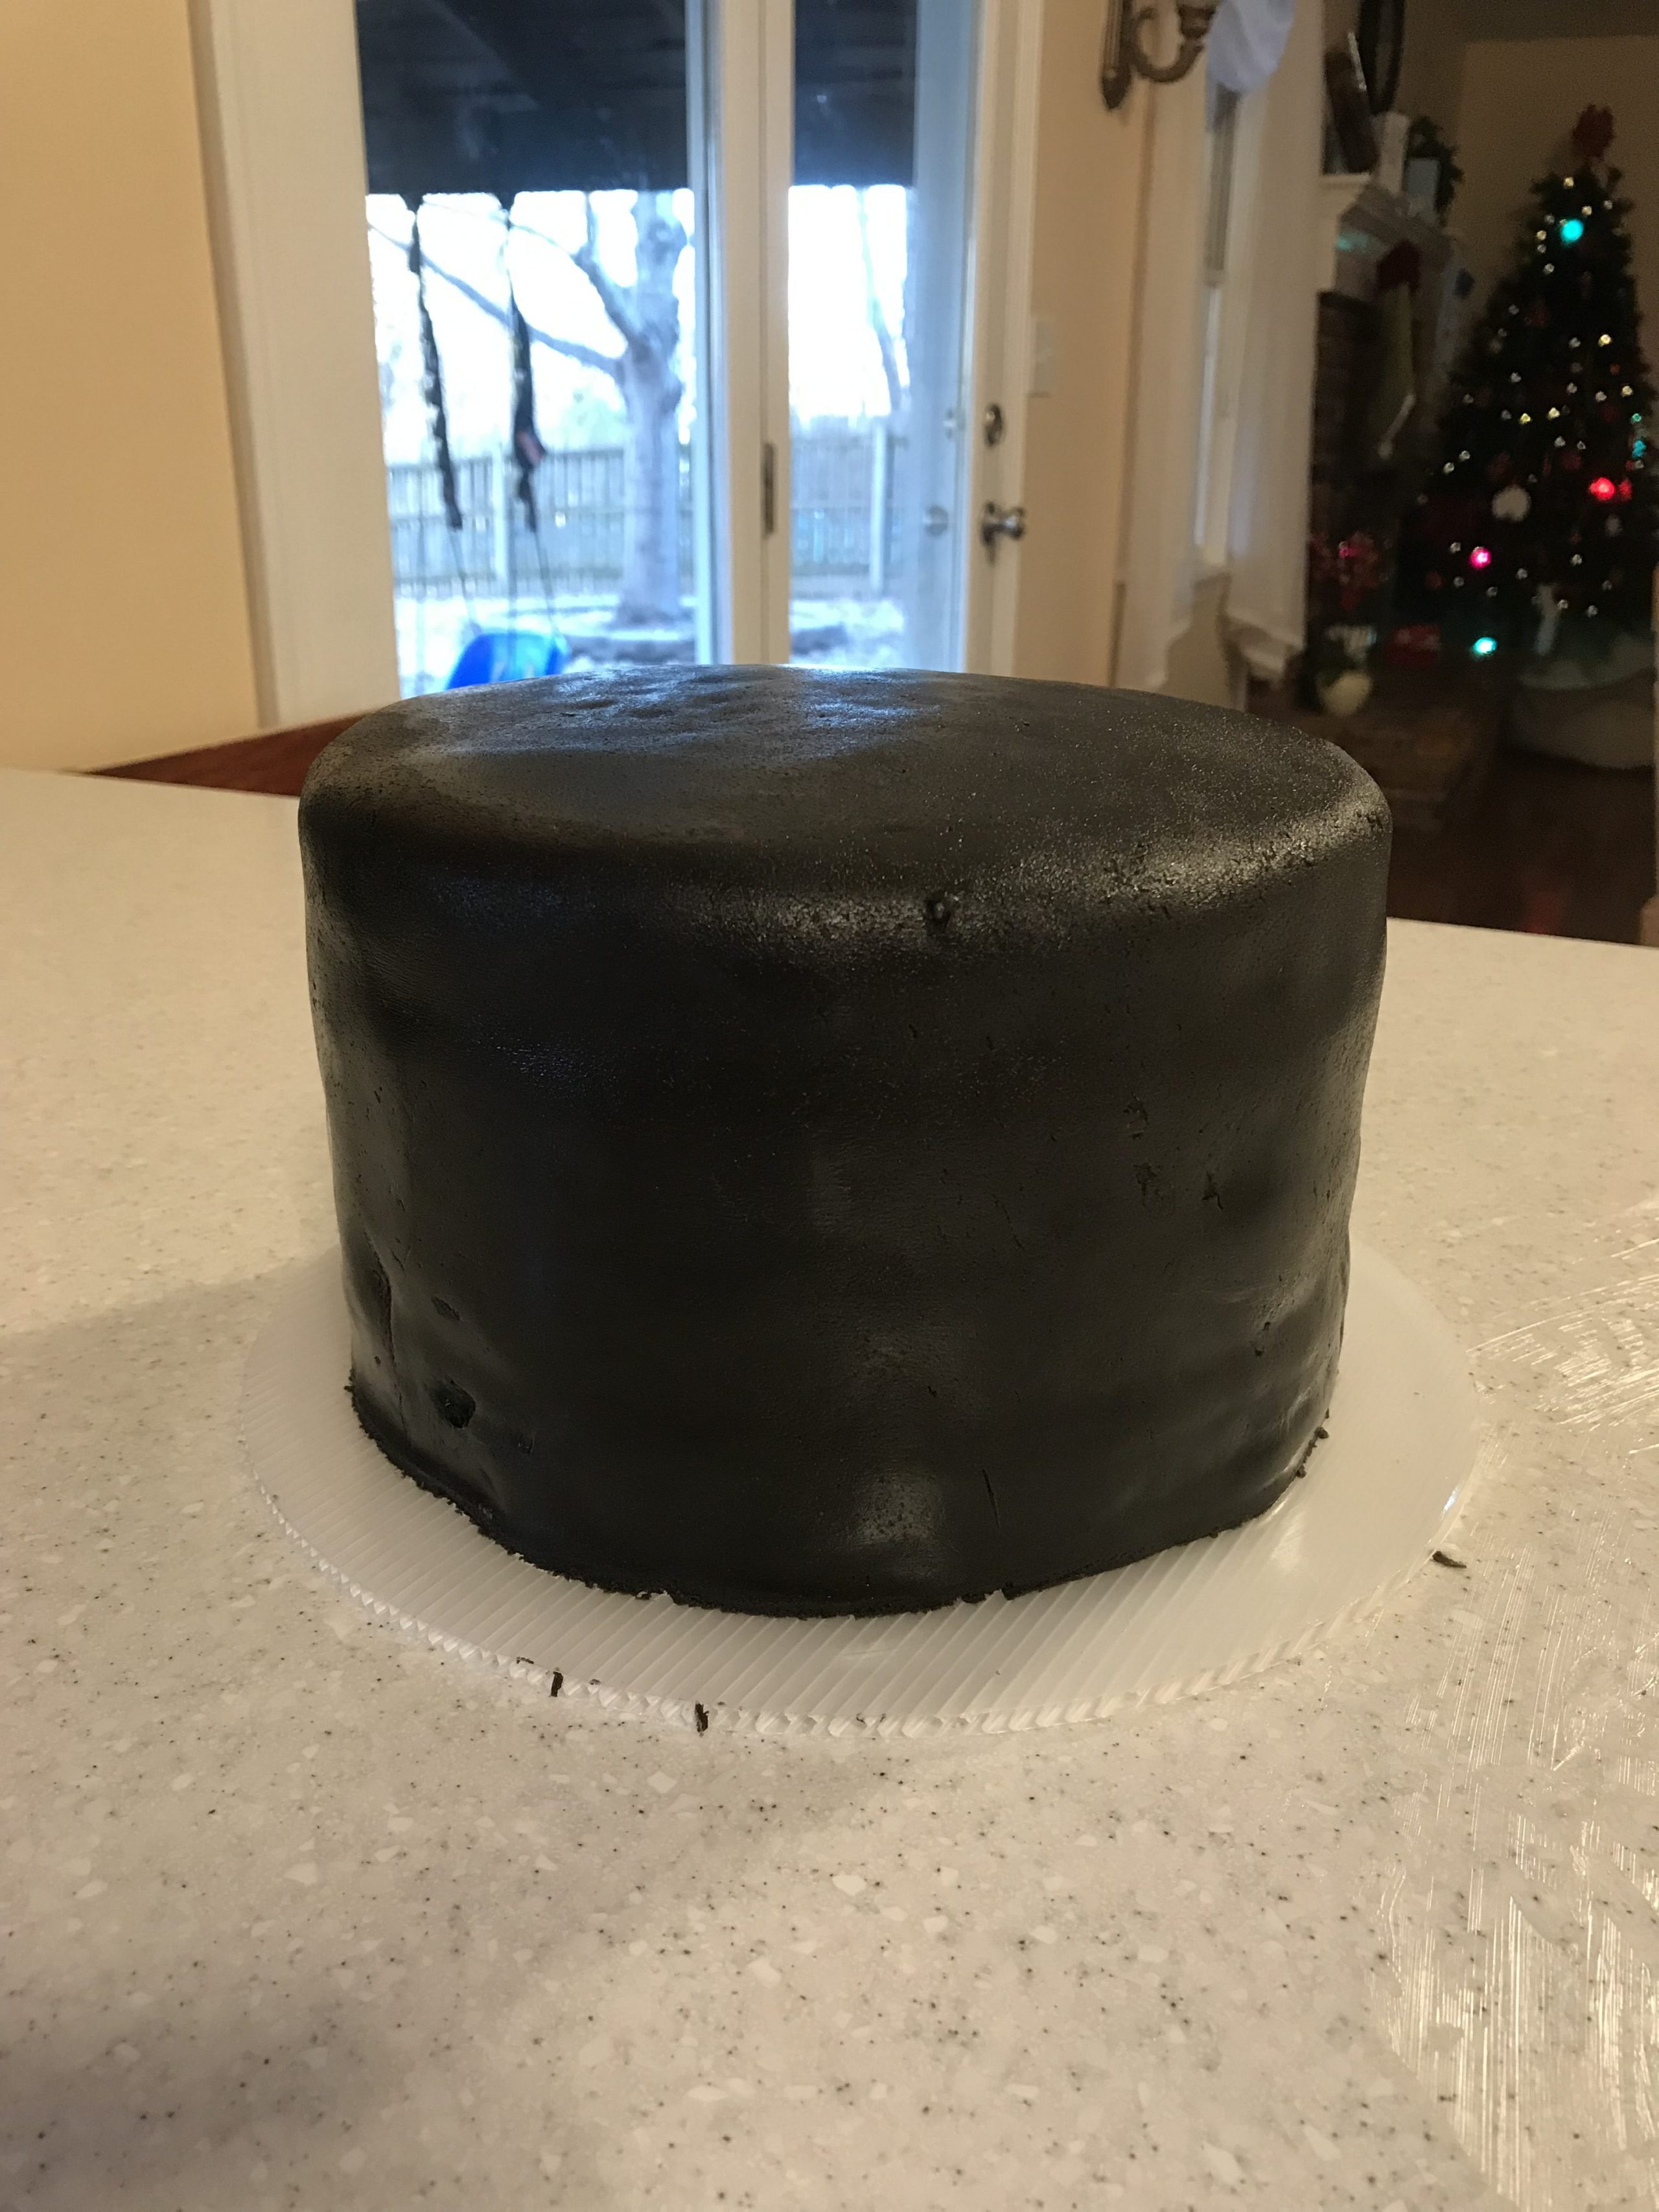
    The other negative outcome from not making my own icing was that I also used it as my crumb coat and it was too wet. This caused my fondant to moisten and pull away from the cake. It actually developed a hole and slid partway off which has never happened to me before! I'll admit, I was a little horrified ;) I patched it up but you can see what I mean about it sliding/pulling away in the photo right where the light hits the side.

    I thought maybe I didn't use enough powdered sugar in my fondant because it was a little wet after I rolled it out on the shortening greased countertop. I really forgot what it was supposed to feel like and just kind of guessed. However, now I think it was wet because I used regular food coloring instead of gel. I know you're supposed to use gel coloring for fondant but I didn't even think to check for gluten free gel food coloring. Turns out, it exists! (Update: I used it in the frosting on my son's 2nd birthday cake and it seems to works well!) The wet fondant combined with the wetter crumb coat contributed to that hole I mentioned. I tried to let the fondant dry out a little by leaving the lid off the cake carrier as long as possible but there was no saving it.

    Allen's Tire Birthday Cake | Learn how to decorate a cake using only gluten free ingredients. I made this vanilla cake decorated in a tire tread pattern for my son's first birthday. | eatsomethingdelicious.com

    I also wish I would have replaced my fondant rolling pin. Oh man, that was tough to get the fondant over the cake without one! I literally wrapped it over my forearm to lift it up without it tearing. Seriously, get a fondant rolling pin. And a lazy susan - I wasn't able to find mine until about a week after I made the cake. Thankfully I was able to hide most of the bumps in my fondant with the tire tread pieces.

    There was actually one area I cut corners on and it probably turned out better! I typically only decorate my cake with edible ingredients and planned on making sugar cookie cars but they probably would have been too big. I asked Lenny to pick up a red or blue toy car so he picked those and I love the way they look on the cake. He even found a CRX which he used to drive so that was a really neat addition!

    Print
    Allen's Tire Birthday Cake | Learn how to decorate a cake using only gluten free ingredients. I made this vanilla cake decorated in a tire tread pattern for my son's first birthday. | eatsomethingdelicious.com

    Allen's Tire Birthday Cake

    • Author: Meagan Fikes
    • Prep Time: 8 hours
    • Cook Time: 1 hour
    • Total Time: 9 hours
    • Yield: 22 servings 1x
    • Method: baking
    Print
    Pin

    Description

    Learn how to decorate a cake using only gluten free ingredients. I made this vanilla cake decorated in a tire tread pattern for my son's first birthday.


    Ingredients

    *Please see notes section at bottom of recipe first*

    • Black gel food coloring, as needed
    • one batch of marshmallow fondant, dyed with the black food coloring
    • 2 bags Bobs red mill gluten free vanilla yellow cake mix
    • 2 ¼ C Spectrum palm shortening, divided (Crisco may contain gluten)
    • ¼ C gluten free all purpose flour
    • 2 eggs
    • 6 egg whites
    • 1 C dairy free butter substitute, melted
    • 1 ¼ C water, divided
    • 2 tsp gluten free vanilla
    • 8 C (32 oz) powdered sugar
    • 32 oz (2 jars) gluten free, dairy free frosting of choice (I used Betty Crocker vanilla frosting which doesn't use dairy ingredients but still carries some risk for containing dairy. Simple Mills is another brand I like and is less sweet.)
    • Yellow food coloring, as needed
    • Green food coloring, as needed

    Special equipment needed:

    • 2 8 inch round cake pans (make sure the walls are at a 90º angle to the base and don't taper outward like a pie pan would)
    • cooling rack
    • 10 inch cake circle/cake board (I found plastic reusable ones but couldn't find them online. Something like these cardboard cake circles would work too)
    • Lazy susan/cake turntable - optional but recommended!
    • angled spatula
    • piping bag
    • large fondant rolling pin
    • fondant smoother
    • Printer paper
    • scissors
    • Wilton tip #2
    • Wilton tip #233
    • one or two small toy cars
    • birthday candle(s)

    Instructions

    1. It's recommended to let the fondant sit overnight so make the fondant (dyed with the black food coloring) the night before you make your cake, if possible. If you like, you can also bake the cakes ahead of time so they have time to completely cool (see next steps).
    2. Preheat oven to required temperature as indicated on your packages of cake mix (325ºF for Bob's Red Mill brand).
    3. Use shortening (or butter substitute if you prefer) to heavily grease the two 8 inch round cake pans - you'll want to make sure there are no bare spots. Add about a tablespoon of gluten free flour to each pan and completely coat the greased surface with the flour by rotating and tapping the pan. Feel free to add extra flour if needed - any excess flour can be dumped out or saved for the next batch of cake. Just make sure there are no large clumps of flour, especially in the edges of the pan that would create dents in the cake. Set aside.
    4. Follow instructions on the package to prepare the first cake mix batter (I just did one package at a time). For the Bob's Red Mill cake mix, you'll want to reference the "white cake variation" instructions. Divide this first batch evenly between the two cake pans. Bake according to package directions.
    5. As soon as the first batch of cake comes out of the oven, move the pans to a cooling rack and set a timer for 15 minutes. While the cakes are cooling in the pans, prepare the next package of cake mix and set the batter aside.
    6. Once the 15 minute timer elapses, gently jiggle the cake pans until the cake moves around freely. At this point, you can flip them out of the pan and onto the cooling rack without the cake breaking. Wash and dry the cake pans and prep again as you did in step 3. Repeat the same process to bake, cool, and remove the cake from the pans.
    7. While the cakes cool the rest of the way, you can make the icing needed for the crumb coat and piping work. In a stand mixer with a paddle attachment, cream together 1 ¾ C of the shortening, ¼ C of the water, and vanilla. Slowly add the powdered sugar and continue to beat. (It should be stiff.) Transfer to an airtight container and cover the top with a layer of plastic wrap before covering with a lid. You don't want any air between the plastic wrap and the icing. Set aside.
    8. Once the cakes have cooled completely, use a bread knife to level them off. You'll want to make sure the surface is flat then use a basting brush to brush away any loose crumbs.
    9. If you're wrapping the cake board in any sort of decorative foil, do that now (I chose not to do this). Place the cake board centered on the lazy susan and smear a small dollop of the piping icing you made onto the middle of the cake board. Place one of your four cake layers in the middle of the cake board so it's secured by the icing smear.
    10. Spread a thick layer of frosting (the store-bought stuff, not the icing you made) on top of this layer and use the angled spatula to spread it evenly. You can use a piping bag to dispense the frosting if it's easier for you. Top with the next layer and repeat until you get to the top (the top won't need frosting over it). When you get to the very top layer, I recommend placing it leveled side down so you get the clean edges from the cake pan on top. Use the remaining frosting to fill in any gaps between the layers so you have one solid stack of cake (this is where a piping bag is helpful).
    11. Get out the icing you made and if it's been setting a while, you can whip it in a stand mixer to make it easier to spread. Spread a thin layer of this over the outside of the cake. Note that this layer isn't for frosting the cake, it's just to contain any loose crumbs and to allow the fondant to adhere to the cake. Too thick of a layer can cause the fondant to soften and break. After icing, make sure your cake is still stacked nicely before proceeding. Set the cake aside and store the remaining icing as you did before with plastic wrap and an airtight container.Allen's Tire Birthday Cake | Learn how to decorate a cake using only gluten free ingredients. I made this vanilla cake decorated in a tire tread pattern for my son's first birthday. | eatsomethingdelicious.com
    12. Clean a large, smooth work surface very well since this is where you'll roll out your fondant. You can use a countertop or a fondant mat. Set out a bowl with plenty of shortening in it. Grease your cleaned work surface, fondant rolling pin, and hands (sorry) with the shortening. Knead your fondant until it is pliable and roll it out into a circle large enough to fully cover your cake. Use the shortening in the bowl to re-grease anything, as needed. If your fondant gets cracks, holes, or wrinkles, just knead it and roll it out again! You may need to add more powdered sugar if you roll it out too many times because it will absorb a lot of the shortening and become too wet.
    13. The easiest way to get the fondant onto the cake is to lift up one end and start gently wrapping it around the rolling pin until the entire circle has been wrapped up. Starting at the base of your cake, slowly unroll the fondant up and over the top then back down the other side until it is covered. Grease the fondant smoother with the shortening and gently coax the fondant to lay flat against every surface of the cake, down to the base. Once you work your way down to the base, use a fondant cutter or knife to cut away the excess fondant (save this excess for the next step!). Use a damp paper towel or cotton swabs to clean the exposed area of the cake board. *Tip: If you develop small cracks in the fondant after it's already on the cake, paint in the area with some of the black food coloring.*Allen's Tire Birthday Cake | Learn how to decorate a cake using only gluten free ingredients. I made this vanilla cake decorated in a tire tread pattern for my son's first birthday. | eatsomethingdelicious.com
    14. Knead the excess fondant and roll it out again. Use a fondant cutter or plastic knife (if you rolled the fondant directly on your countertop, be sure to use something that won't scratch) to cut into tire tread shapes as seen in the finished product photos. Each shape should be about the height of one layer of cake so you get four layers of "tread". Follow the pattern in the photos to place each shape onto the cake. They should stick without needing to add anything.Allen's Tire Birthday Cake | Learn how to decorate a cake using only gluten free ingredients. I made this vanilla cake decorated in a tire tread pattern for my son's first birthday. | eatsomethingdelicious.com
    15. On your printer paper, draw or print a large block lettering style number (the person's age!). Make sure it will fit on the top of your cake and use scissors to cut it out as nicely as you can. Place this on the top of the cake and use a butterknife or something similar to gently trace around the paper number so you get a shallow indention in the fondant then remove the paper.Allen's Tire Birthday Cake | Learn how to decorate a cake using only gluten free ingredients. I made this vanilla cake decorated in a tire tread pattern for my son's first birthday. | eatsomethingdelicious.com
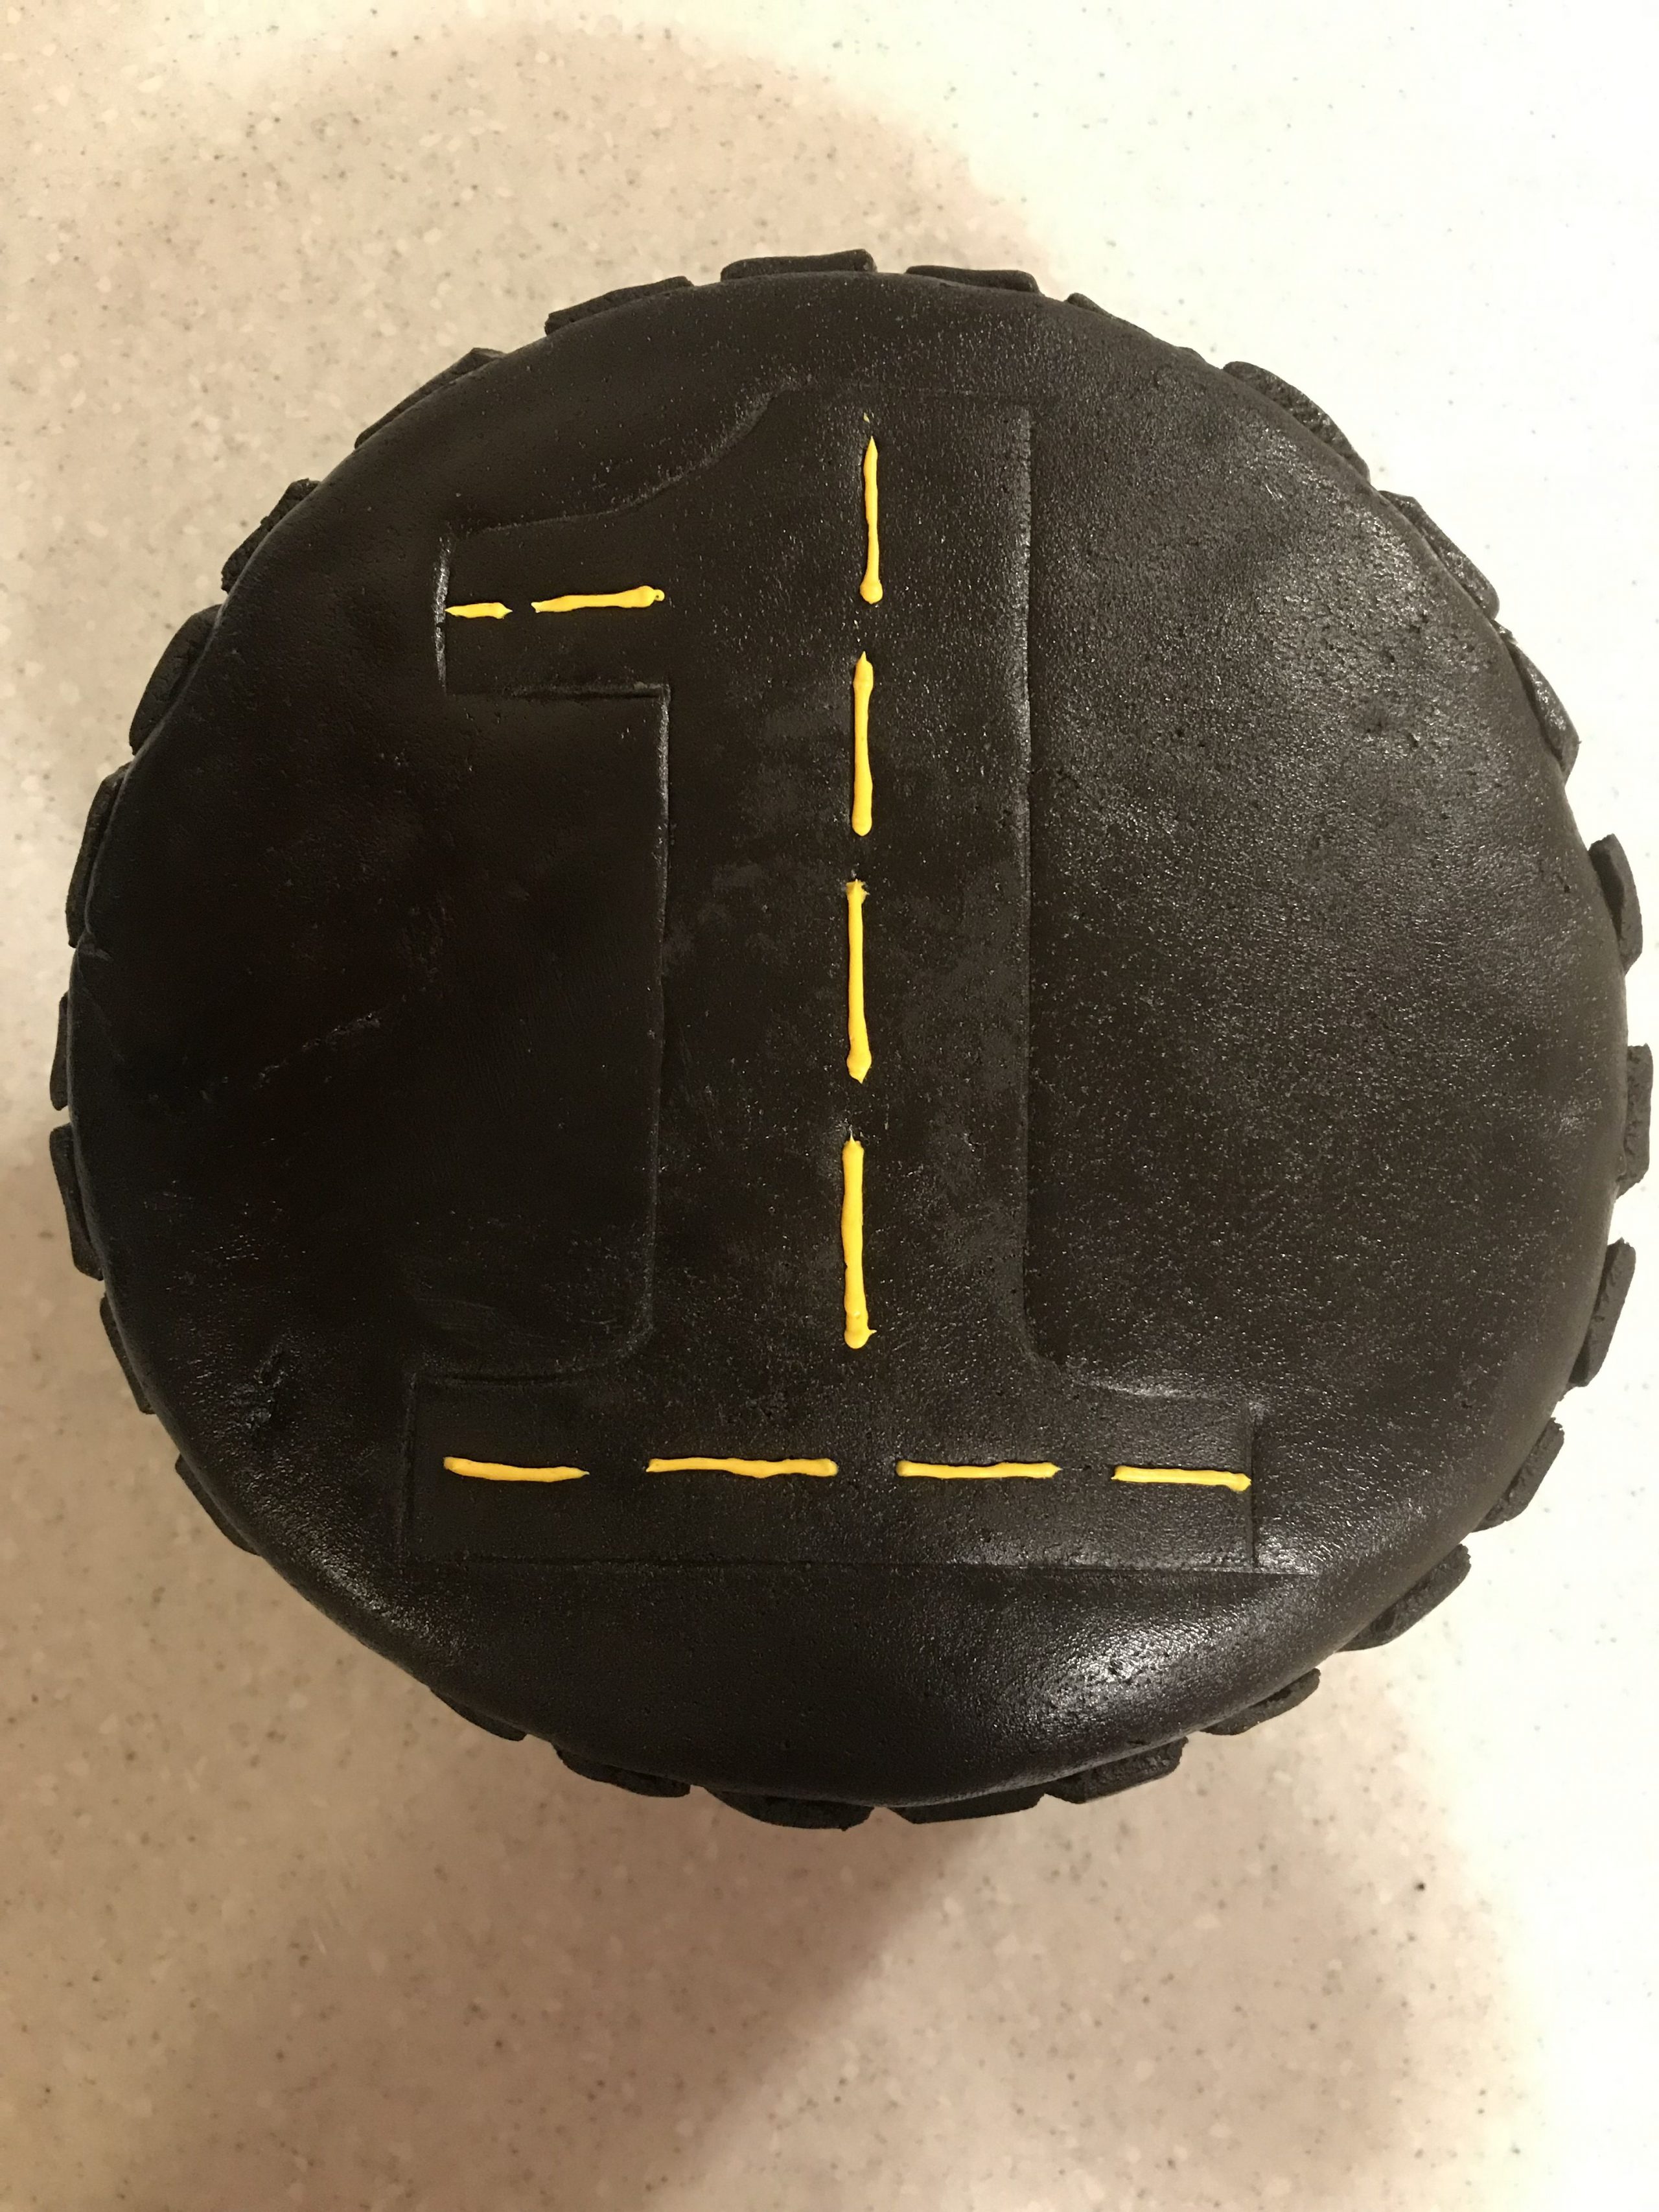
    16. Take a small portion of your piping icing (not much, it's just to make the yellow lines on the road!) and stir in some yellow food coloring until you get a dark yellow color similar to road markings. Use a piping bag and Wilton tip #2 to pipe road lines along the middle of the number. I just did a single dashed yellow line but you could do double lines or solid lines if you wish. Tip: practice on the paper number to see what looks best to you.
    17. Mix green food coloring into the remainder of your piping icing until it reaches the shade you'd like for the grass. Put this in a clean piping bag with the Wilton tip #233. Pipe grass all over the top of the cake, staying outside the number you outlined.Allen's Tire Birthday Cake | Learn how to decorate a cake using only gluten free ingredients. I made this vanilla cake decorated in a tire tread pattern for my son's first birthday. | eatsomethingdelicious.com
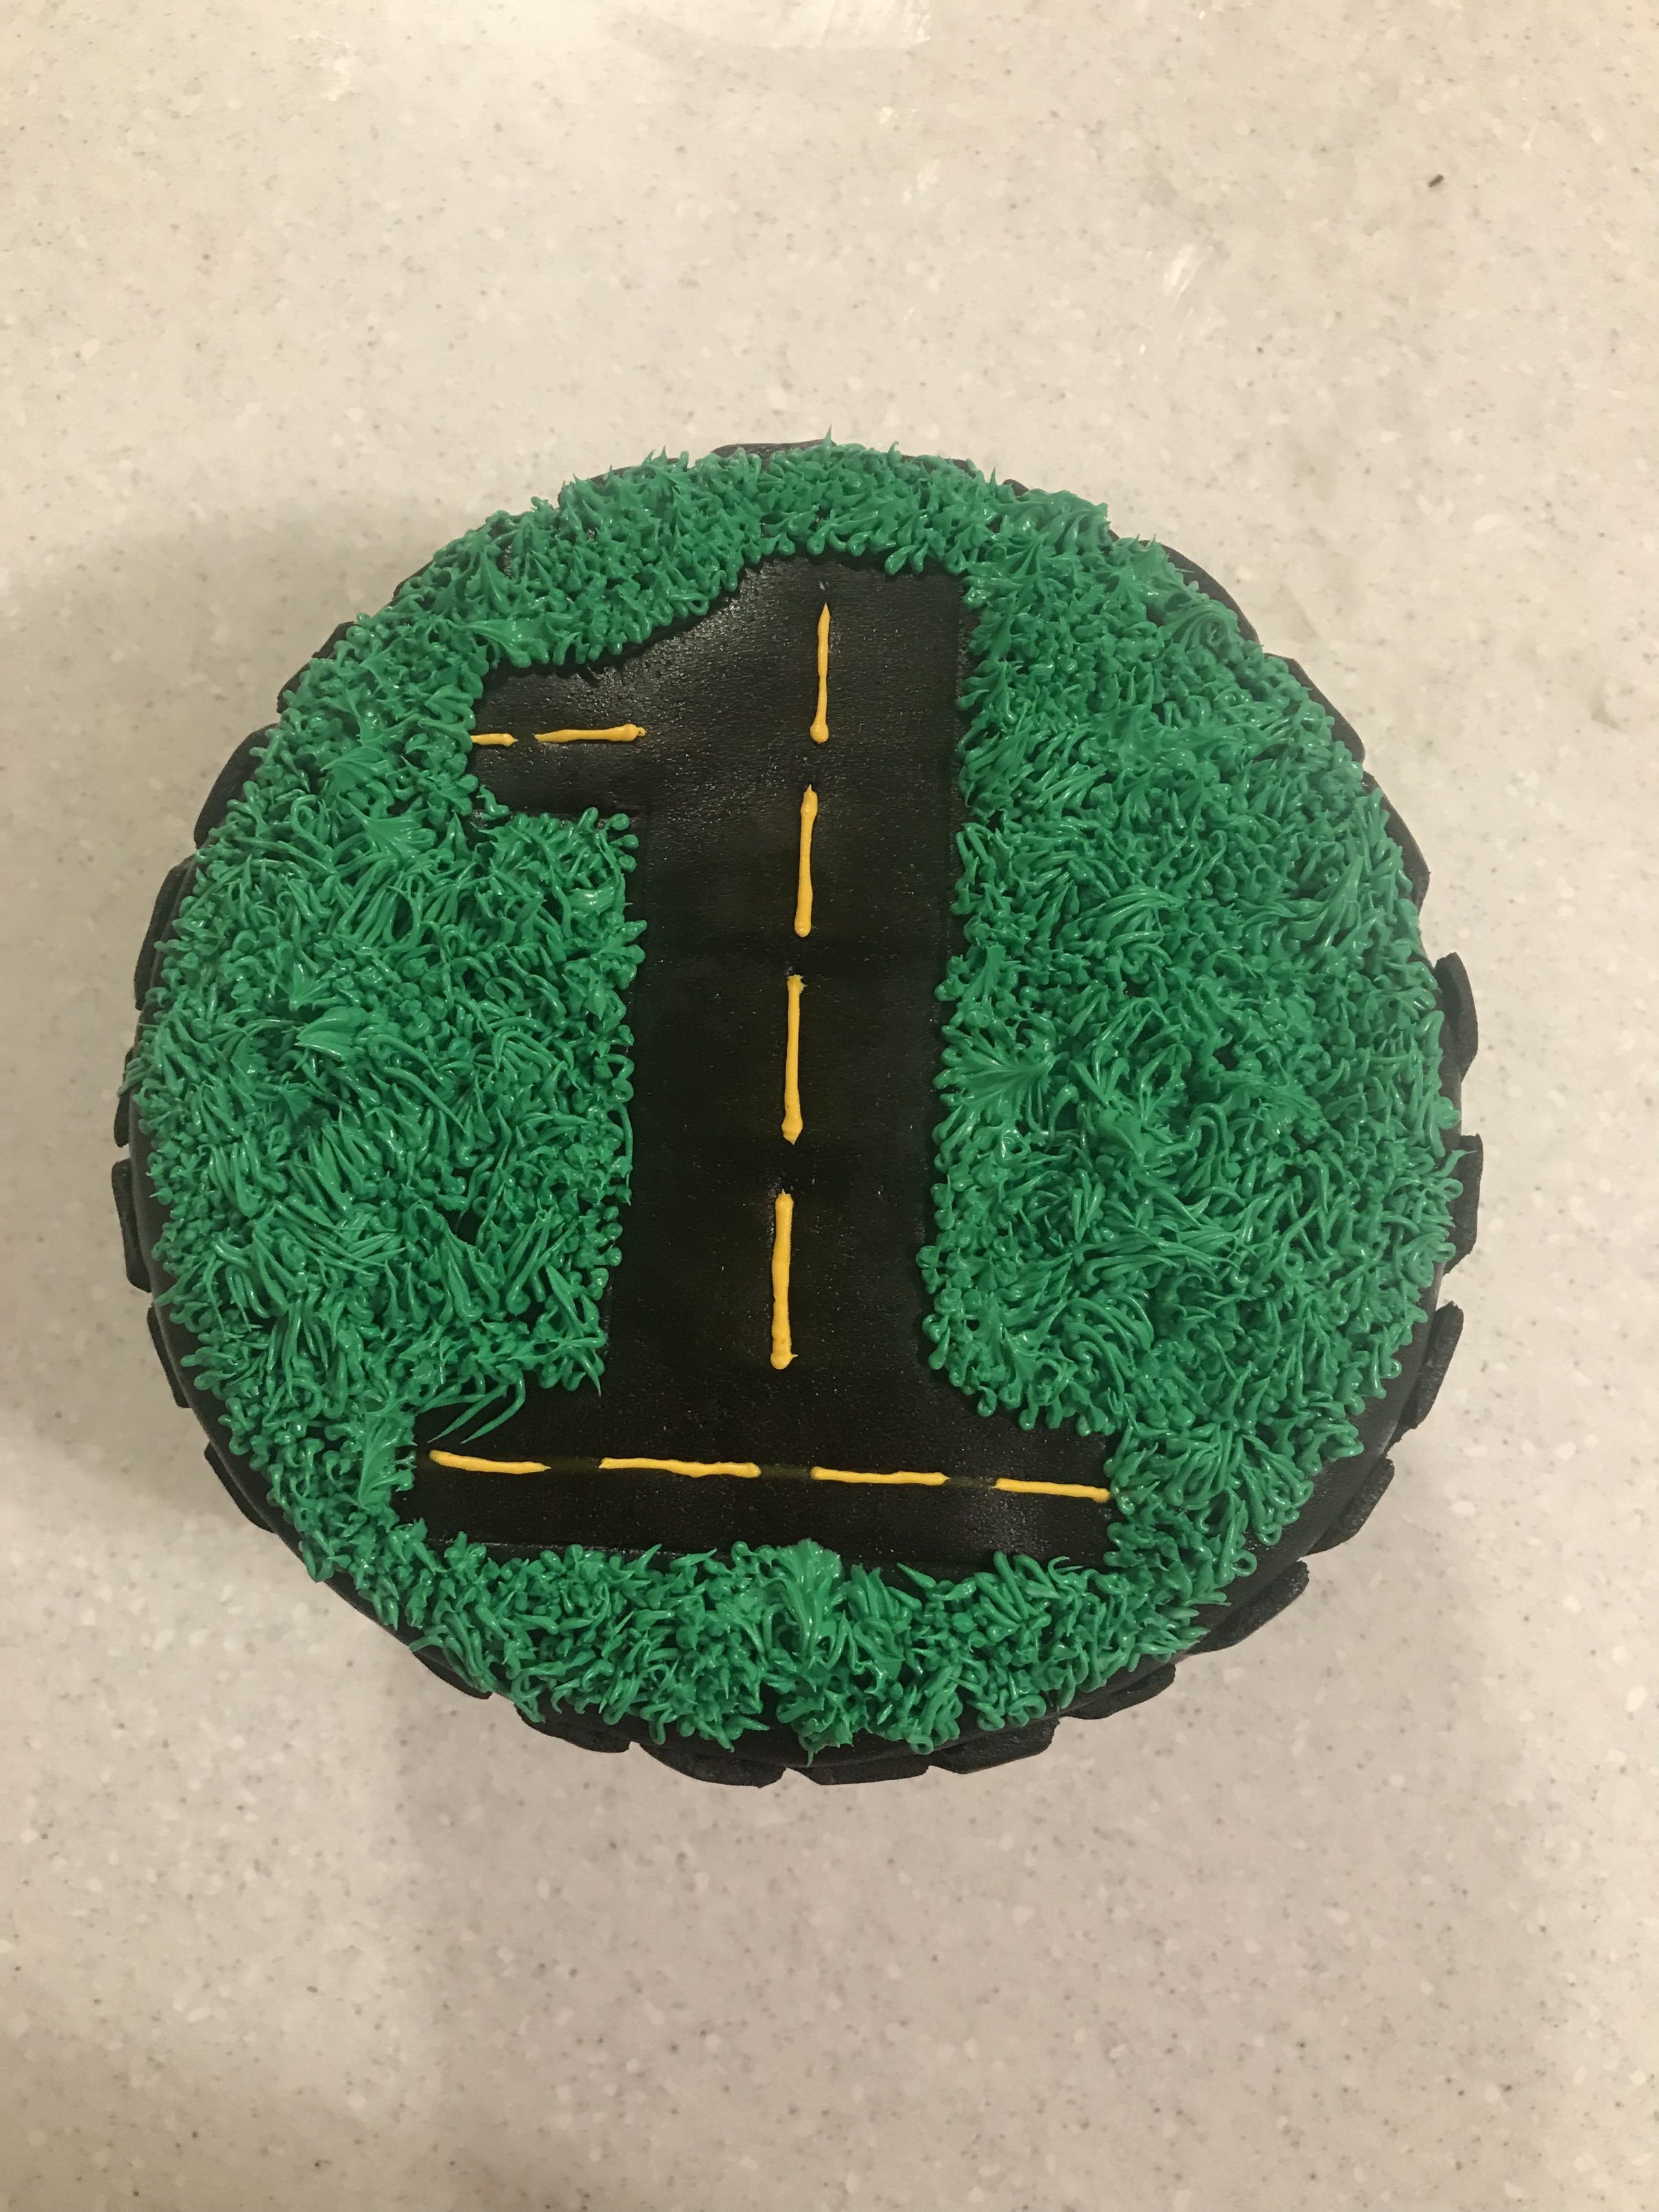
    18. You can also pipe grass around the base of the cake if you like. You could do just a few tufts of grass sticking out from under the tire or pipe to cover up the cake board like I did. It's whatever you think looks best. Here's what it looks like without the grass at the base:Allen's Tire Birthday Cake | Learn how to decorate a cake using only gluten free ingredients. I made this vanilla cake decorated in a tire tread pattern for my son's first birthday. | eatsomethingdelicious.com
    19. Finally select spots to place the one or two toy cars and candle(s) and you're finished! (Finally!)Allen's Tire Birthday Cake | Learn how to decorate a cake using only gluten free ingredients. I made this vanilla cake decorated in a tire tread pattern for my son's first birthday. | eatsomethingdelicious.com

    Notes

    I've linked to many of the products I used for this recipe which worked for me (severely gluten intolerant and mild dairy allergy) but if you have food allergies/intolerances or are cooking for someone who does, please thoroughly research the ingredients you buy and follow safe practices to prevent the cross contamination of any problematic allergens while cooking.

    Even if you own four of those 8 inch round cake pans, you don't want to put four pans in the oven at the same time unless they all fit on the same rack. If you have some on the top rack and some on the bottom, they won't bake correctly.

    Did you make this recipe?

    Tag @eatsomethingdelicious on Instagram and hashtag it #eatsomethingdelicious

    « Magic Cookie Bars
    Cheesy Tuna Noodle Casserole »

    Reader Interactions

    Leave a Reply Cancel reply

    Your email address will not be published. Required fields are marked *

    Recipe rating ★☆ ★☆ ★☆ ★☆ ★☆

    This site uses Akismet to reduce spam. Learn how your comment data is processed.

    Primary Sidebar

    About Meagan

    About Meagan

    I started out with a passion for creating unique recipes and decorating cakes. In June of 2012, I discovered I was not only severely gluten intolerant but also, many of the foods I was eating I simply couldn't include in my diet anymore. Fortunately, my love for trying new recipes, ingredients, and cooking methods made re-learning how to cook seem more like a fun challenge than an unfortunate circumstance. I'm so happy to say that my dietary restrictions haven't stopped me from doing what I love. I hope you enjoy these recipes as much as I do.

    Some links on this site are affiliate links which means that if you make a purchase at one of these links, I may receive a small commission at no additional cost to you. I only link to products and services I personally recommend and believe will benefit my readers. These links help to cover some of my blogging expenses. I appreciate your support!

    I'm a member of Food Blogger Pro. Learn how to start and grow your food blog.

    logo

    Food Advertisements by
    Affiliate link for 10 percent off your first order of Katz gluten free using the coupon code KATZ10. Click this image to purchase.
    Affiliate link for The Osso Good Co. bone broths. Image shows a sample selection of products in a pouch type packaging including beef, signature, or chicken bone broths as well as thai carrot, butternut squash, and tomato basil soups
    logo

    Food Advertisements by

    Footer

    ↑ back to top

    Eat Something Delicious logo

    Additional Content

    • Ingredient Guide
    • Gluten Intolerance & Celiac Disease
    • Recipe Index
    • FAQ

    Still Hungry?

    Join my newsletter to get email exclusive recipes, free downloads, and notifications of new blog posts - all by email.

    Sign Me Up!

    eatsomethingdelicious

    eatsomethingdelicious
    She’s finally here 🥰 Erika Claire Fikes was b She’s finally here 🥰
Erika Claire Fikes was born January 24th, 2022 at 1:35pm. 7lb 9 oz, 19 inches.
    Not really a new recipe but I shared my sons 4th b Not really a new recipe but I shared my sons 4th birthday cake on the blog today. Also wrote a recap on everything that’s been going on for the past year since I would normally write about it in my blog posts but haven’t written anything! I don’t know when I’ll be back on there. I’ve only had time for site maintenance and I really miss blogging but I’ll be back on once things slow down. The link to the new post is in my profile!
.
.
.
.
.
.
.
#glutenfree #dairyfree #cakedecorating #foodallergies #celiacdisease
    I almost didn’t make this into a casserole becau I almost didn’t make this into a casserole because the sauce and pasta combined made a delicious side dish on their own! @beldolcefood #sponsored my most recent blog post and provided me with their new gluten free fusilli and penne to try out. I used the fusilli in this recipe and the sauce is a creamy, cheesy enchilada sauce made from just 3 ingredients.
.
I ended up adding taco meat, fire roasted tomatoes, corn, black beans, and dairy free cheese to make a taco noodle casserole. Then we ate it all and I made it again! This is one of those recipes that will be going in our regular meal rotation.
.
This is a pretty versatile recipe. It can be made vegan just by leaving out the meat and it’s just as good. And as I said earlier, the pasta with just the sauce makes a really good side dish. You can also top it with whatever you like such as cilantro, jalapeños, sour cream, scallions, or salsa.
.
The recipe and details on @beldolcefood new gluten free pasta is linked in my profile:
@eatsomethingdelicious
Let me know if you try it!
.
.
.
.
.
.
.
.
.
#glutenfree #dairyfree #glutenfreefacility #pasta #casserole #beldolce #foodallergies #f52grams #foodbloggerpro #celiac #glutenintolerant #eatsomethingdelicious
    I’ll just say it - I’m one of those bloggers t I’ll just say it - I’m one of those bloggers that makes cakes for their blogs “birthdays”. Or uses the blog birthdays as an excuse to make yet another cake recipe....yeah, that’s probably more accurate.
.
Definitely felt like I needed a good excuse for this one because it’s my fifth variation of gooey butter cake! However, my site is seven years old so maybe I should have had seven gooey butter cakes ready to go? Guess I’d better get caught up before year eight 😉
.
Anyways, I really enjoyed this carrot cake variation of gooey butter cake. The cake layer/crust swaps out the yellow cake mix with spice cake mix and I added in some shredded carrots and raisins. I kept the “gooey” top layer the same except that I topped it with a sprinkle of cinnamon and additional raisins before baking.
.
If you want to try the recipe, the link is in my profile: @eatsomethingdelicious
.
.
.

.
.
.
.
.
.
.
.
#gooeybuttercake #foodallergies #glutenfree #dairyfree #foodbloggerpro #baking #celiac #f52grams #f52sweets #glutenintolerant #carrotcake
#glutenfreelife #eatsomethingdelicious
    Couldn’t decide which to use on his birthday inv Couldn’t decide which to use on his birthday invites so got a big trifold card and used almost all of them 😅 This is the first time he’s cooperated (sort of) for his “milestone block” photos since he learned to roll over so it’s been a long time!
    Here are a few last minute treat ideas! The carame Here are a few last minute treat ideas! The caramel stuffed crispy rice treats recipe is written below. The other recipes (gooey butter cookies, salted caramel turtles, and pumpkin snickerdoodles) can be found at the link in my bio!
.
CARAMEL STUFFED CRISPY RICE TREATS
.
INGREDIENTS
.
• ¼ C dairy free butter, divided
• 4 C mini marshmallows (regular and vegan both work), divided
• 6 C gluten free rice cereal *see notes*
• 1 tsp vanilla extract, divided
• 10-11 oz dairy free chewy caramels
• 11.25 oz can sweetened condensed coconut milk
.
DIRECTIONS
.
1. Melt 2 tablespoons of the dairy free butter in a medium sauce pan over medium-low heat. Add 2 cups of marshmallows and stir until they are melted with no lumps.
2. Remove from heat and stir in ½ tsp of vanilla then gently fold in 3 cups of cereal until it is well-combined with the marshmallows.
3. Using wet hands, press this mixture evenly into the bottom of a 7x11 inch casserole dish and set aside.
4. Unwrap the caramels and add them along with the sweetened condensed coconut milk to a small saucepan over medium-low heat. Stir often to avoid burning. Once this has turned to a completely smooth sauce, pour over the cereal layer.
5. Make your top cereal layer by repeating steps 1 and 2. Distribute this evenly over the caramel layer and pat down with wet hands.
6. Once the treats have cooled down, they will firm up and hold their shape when cut. Cut into squares and serve.
.
NOTES
.
• Potential allergens contained in this recipe may vary due to brands of ingredients used, product reformulations, etc. Please verify that all your ingredients are safe for you to consume and always be mindful of allergen cross contamination while cooking.
• Double check that the cereal you use is gluten free. At least one brand carries 2 different versions of rice cereal and only one is GF.
• Don't make both cereal layers in one large batch then divide it up. The top layer will cool and firm up before you can layer it on which will make the caramel seep out when you press it down.
    Load More... Follow on Instagram

    Privacy Policy • Terms & Conditions • Accessibility Policy

    COPYRIGHT © 2014-2023 EAT SOMETHING DELICIOUS • ALL RIGHTS RESERVED

    I use cookies on my website to give you the most relevant experience by remembering your preferences and repeat visits. By clicking “Accept”, you consent to the use of ALL the cookies. However, you may visit "Cookie Settings" to provide a controlled consent. For more information, view my privacy policy.
    Do not sell my personal information.
    Cookie SettingsAccept
    Manage consent

    Privacy Overview

    This website uses cookies to improve your experience while you navigate through the website. Out of these, the cookies that are categorized as necessary are stored on your browser as they are essential for the working of basic functionalities of the website. We also use third-party cookies that help us analyze and understand how you use this website. These cookies will be stored in your browser only with your consent. You also have the option to opt-out of these cookies. But opting out of some of these cookies may affect your browsing experience.
    Necessary
    Always Enabled
    Necessary cookies are absolutely essential for the website to function properly. These cookies ensure basic functionalities and security features of the website, anonymously.
    CookieDurationDescription
    cookielawinfo-checkbox-analytics11 monthsThis cookie is set by GDPR Cookie Consent plugin. The cookie is used to store the user consent for the cookies in the category "Analytics".
    cookielawinfo-checkbox-functional11 monthsThe cookie is set by GDPR cookie consent to record the user consent for the cookies in the category "Functional".
    cookielawinfo-checkbox-necessary11 monthsThis cookie is set by GDPR Cookie Consent plugin. The cookies is used to store the user consent for the cookies in the category "Necessary".
    cookielawinfo-checkbox-others11 monthsThis cookie is set by GDPR Cookie Consent plugin. The cookie is used to store the user consent for the cookies in the category "Other.
    cookielawinfo-checkbox-performance11 monthsThis cookie is set by GDPR Cookie Consent plugin. The cookie is used to store the user consent for the cookies in the category "Performance".
    viewed_cookie_policy11 monthsThe cookie is set by the GDPR Cookie Consent plugin and is used to store whether or not user has consented to the use of cookies. It does not store any personal data.
    Functional
    Functional cookies help to perform certain functionalities like sharing the content of the website on social media platforms, collect feedbacks, and other third-party features.
    Performance
    Performance cookies are used to understand and analyze the key performance indexes of the website which helps in delivering a better user experience for the visitors.
    Analytics
    Analytical cookies are used to understand how visitors interact with the website. These cookies help provide information on metrics the number of visitors, bounce rate, traffic source, etc.
    Advertisement
    Advertisement cookies are used to provide visitors with relevant ads and marketing campaigns. These cookies track visitors across websites and collect information to provide customized ads.
    Others
    Other uncategorized cookies are those that are being analyzed and have not been classified into a category as yet.
    SAVE & ACCEPT